This is a preliminary lab for CS2102. You will become familiar with the lab environment and the Eclipse Integrated Development Environment (IDE) that will be used daily in this course.
If you are in the Lab, perform the routine KH 202 setup or AK 120D setup; for now, ignore the "advanced setup" options. If you would like to set up Eclipse on your personal computer, then (a) install Java JDK 1.5 if you need to as described in tools section (here); and (b) install Eclipse as described in tools section (here).
At the completion of this lab, you must hand in your answer(s) to the following question(s)
Once Eclipse is running, there is a tutorial that you should follow. Find it through the Help menu. Select Welcome which will bring up a full-screen window; select the Tutorials icon and within this, select Java Development.
On the right side of your screen, you will get a new panel that will provide documented step-by-step methods to build your first Java application, called the Hello World application. Follow each step until you have completed the tutorial.
Java provides several different primitive types that you will be using on a regular basis. In this lab exercise, you will gain experience in using the int, float, double, boolean, and char types.
Insert the following statements so your original "Hello, World" program written in task T1 now reads as:
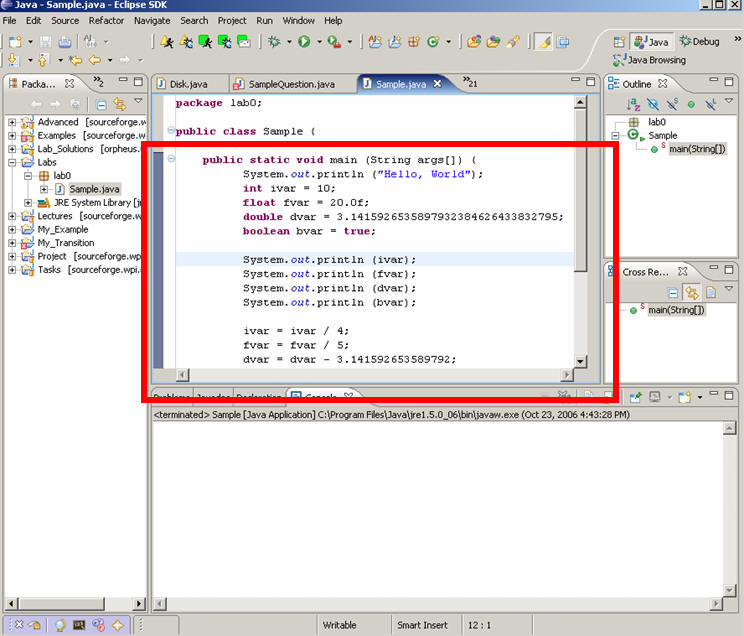
public static void main (String args[]) {
System.out.println ("Hello, World");
int ivar = 10;
float fvar = 20.0f;
double dvar = 3.1415926535897932384626433832795;
boolean bvar = true;
System.out.println (ivar);
System.out.println (fvar);
System.out.println (dvar);
System.out.println (bvar);
}Figure 1. Extended tutorial with basic types
Note how a Java method is constructed to be a sequence of statements terminated by a ";". Execute the program (as you did during task T1). To do so, right-click on the icon next the class you created during step T1, find the menu sub-item Run As... -> Java Application.
What do you expect as output? Execute the program and compare the actual output with your expectations. Now continue and extend the program as follows:
public static void main (String args[]) {
System.out.println ("Hello, World");
int ivar = 10;
float fvar = 20.0f;
double dvar = 3.1415926535897932384626433832795;
boolean bvar = true;
System.out.println (ivar);
System.out.println (fvar);
System.out.println (dvar);
System.out.println (bvar);
ivar = ivar / 4;
fvar = fvar / 5;
dvar = dvar - 3.141592653589792;
bvar = ! bvar;System.out.println (ivar);
System.out.println (fvar);
System.out.println (dvar);
System.out.println (bvar);
}Figure 2. Further Extensions
Make sure you understand why the output is as it appears.
Go back to the main Java perspective for your project. Open the class that
contains the method you implemented in tasks T2. Scroll down until the main
method is visible in the Eclipse editor (or click on main within the
outline window). You will see something that looks more-or-less like the
following:
|
I have highlighted with a red rectangle the area of interest. Note the darkened vertical column to the left of the method body. If you click to place the cursor on the first "System.out.println" line and then return to this column, click with the right mouse to see a pop-up menu with the first item Toggle Breakpoint; select it. You will see a small blue ball appear within the darkened column. Alternatively, you could simply double-click within the darkened column near the line number to which you would like to add a breakpoint.
Now, select Menu Run -> Debug As... -> Java Application. You will be prompted with a dialog because Eclipse would like to open up the Debug Perspective, a useful window for controlling the execution of your program. Your Run Menu now has a range of new options available to you. The key controls for you are:
 ("Step Into") -- enables you to "dive" into a method
call that is about to be executed
("Step Into") -- enables you to "dive" into a method
call that is about to be executed ("Step Over") -- enables you to skip a method call, and simply
make one step advance in your program execution.
("Step Over") -- enables you to skip a method call, and simply
make one step advance in your program execution. ("Resume") -- runs your program at full speed until the next breakpoint is reached
 ("Terminate") -- ends the execution of your program
 System.out.println(fvar); Select Run->Run to Line. You should
see 10, the first printed value in the console output. Now select Run->Step Over. The program
should advance one line. The value 20.0 should appear on the console. Now select
Run->Terminate.
The program will stop executing. You can return to the original view by selecting
Window->Open Perspective->Java.
| Date | Reason/Change |
| 10/16/06 | Initial Page |