Afternoon Module 3
More HTML
by Nate Springer
Topics
Formatting tags
More on the image tag
Adding sound to a web page
Lists
What you should be able to do by the end of the day
Have a firm grasp of the most used HTML tags and have the ability to create a World Wide Web page
containing some advanced features.
Formatting tags
<body>
As you have learned, the <body> tag contains all of the text and images in a page.
However, this is not the only function this tag performs. <body> also controls the color
scheme and the background of a page through its attributes.
The background attribute can be used to designate an image file as a background to a page.
The image would be tiled across the page if it is smaller than the browser window.
The syntax for this tag is:
<body background="filename.gif or filename.jpg">
NOTE: The following attributes control the color scheme in a page. They each require you to specify
which color to use. The following are the two methods in which to accomplish this:
#RRGGBB (red, green, blue)
This method requires you to provide the amounts of red, green and blue contained within the
color in hexadecimal form. For example, red would
be represented by #FF0000 (red:255, green:0, blue:0) and likewise blue would be represented by
#0000FF. This method can be used on all browsers, however, it requires a knowledge of
hexadecimals and of color content.
Netscape Color Names
The meathod involves simply using the name of the color in the attribute. For example, "red" would
produce red and "blue" would produce blue. This method is advantageous if you do not know the
exact makeup of the color. However, this method only works in Netscape Navigator and Internet
Explorer, other browsers will not display the page correctly.
Since the #RRGGBB method works for all browsers, we will be using it exclusively.
The bgcolor attribute sets the background color of the page. Its syntax is:
<body bgcolor="#RRGGBB">
The text attribute sets the color of the text on the page. This attribute will affect all
the text not specifically colored by the <font> tag. Its syntax is:
<body text="#RRGGBB">
The alink, vlink, and link attributes set the color of the links contained in
the page. link refers to color of the unvisited (unclicked) link. vlink refers to
the color of the link after it has been visited (clicked). alink refers to the color of the
link while it is active (the color the link turns while it is being clicked). The syntax of
this attribute is:
<body link="#RRGGBB" vlink="#RRGGBB" alink="#RRGGBB">
<basefont>
The <basefont> tag can be used to set the size and font of all the text contained within
a page through the use of the size and face attributes. This tag usually appears
directly after the body tag.
The size attribute specifies the size that the font will appear. Valid values range from
1 - 7 (1 being the smallest). For example:
This is font 1
This is font 2
This is font 3
This is font 4
This is font 5
This is font 6
This is font 7
The syntax for this attribute is:
<basefont size=(1-7)>
The face attribute sets the type of font displayed on the page. NOTE: This attribute will only
work correctly on computers that have the specified font install on them. (i.e. if you want you page
to use "Times New Roman" font, in order for a visitor to your page to see the font, they must have
"Times New Roman" installed on thier system.) This attribute is also only currently supported by
Microsoft Internet Explorer and Netscape Navigator. The syntax for this attribute is:
<basefont face="font type (i.e. Arial)">
<font>
The <font> container tag sets the color, font face, and size of selected text through the
color, size, and face attributes.
The color attribute sets the color of the text inside the container tag. The syntax of this
attribute is:
<font color="#RRGGBB">Text to be changed</font>
This tag:
<font color="#FF0000">This is red</font> This is normal
<font color="#0000FF">This is blue</font>
would result in:
This is red This is normal This is blue
The size attribute works the same as the size attribute of <basefont> in that it sets
the size of the text inside the container tag. However, if the <basefont> tag has been used
to set the font size for the page, you may change the size of the text relative to the base font
(i.e. +2 would be the base font + 2). The syntax for this attribute is:
<font size=(1-7) or (+/- relative value)>
These tags:
<font size=2>This is set to font 2</font> This is not
or
<basefont size=3>
.
.
<font size=+2>This is set to font 5</font>
would result in:
This is set to font 2 This is not
This is set to font 5
The face attribute sets the type of font of the text inside the container tag. NOTE: This attribute will
only work correctly on computers that have this type of font installed on them. (i.e. if you want
your page to use "Times New Roman" font, in order for a visitor to your page to see that font, they
must have "Times New Roman" installed on their system. This attribute is also only supported by
Netscape Navigator and Internet Explorer. The syntax for this attribute is:
<font face="font type (i.e. Arial)">
More on the <IMG> tag
The <img> tag is used to display images on web pages. Moreover, it is possible to control both the appearence
of the image and how it reacts to the surrounding text throught the use of the align, alt,
border, width, and height attributes.
The align attribute controls the way text reacts to the image. The syntax for this tag is:
<img src="image.xxx" align=left | right | top | middle | bottom>
The results of each of the align values are:
| align=left | |  This text is aligned to the left This text is aligned to the left |
| align=right | | This text is aligned to the right |
| align=top | | This text is aligned to the top |
| align=middle | | This text is aligned to the middle |
| align=bottom | | This text is aligned to the bottom |
The alt attribute is used to display text in place of the image when the image is not, or cannot be, loaded
(usually when the user is viewing a page with a text-only browser.) The syntax for this attribute is:
<img src="path/image.xxx" alt="alternate text">
For example, the following tag
I am happy! <img src="face.jpg" alt="A picture of a face">
would result, on a graphical browser, in:
I am happy!
and a text-only browser in:
I am happy! <A picture of a face>
The border attribute controls the size of the black border surrounding the image. The syntax for this
attribute is:
<img src="image.xxx" border=size>
For example:
<img src="face.jpg" border=2>
This is a border of size 2.
<img src="face.jpg" border=8>
This is a border of size 8.
The width and height attributes set the size of the image in order to allow the browser to load
the entire page before loading the images. When this attribute is not used, visitors to the page must wait
for each image to load completely before the remainder of the page can be displayed. The size of the image is
represented in pixels. The syntax of this attribute is:
<img src="image.xxx" width=value height=value>
Adding sound to a web page
It is now possible to not only add images, but also add sound to web pages; thus making them truly dynamic. The <embed>
tag allows for the addition of sound to a web page. Valid sound formats are WAV (.wav), AU (.au), and MIDI (.mid). The syntax
of this tag is:
<embed src="path/sound.xxx" loop="value">
The loop attribute defines the number of times the sound will repeat. The value would either be a number,
signifying the number of repeats, or 'infinite,' signifying that the sound will repeat until a different page is
loaded.
The <embed> tag is behaves very much like the <img> tag; however, instead of displaying an image on the page,
the <embed> tag plays the specified sound and displays a console on the page.
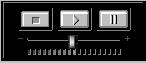
This console allows the visitor to your page to stop, pause, and control the volume of the background sound.
As with the <img> tag, the <embed> tag also allows the page designer to control the height and width of the
console. In order to display the console as above, use the following values:
<embed src="sound.xxx" height=60 width=145>
In order to not display the console at all, simply set the height and width attributes to 0.
Lists
HTML allows a page designer to present data in the form of a list. There are three main types of lists: ordered,
unordered, and definition lists.
An ordered list, as its name implies, produces a numbered list of items sorted by order of importance
or sequence. An ordered list is created by using the <ol>...</ol> container tag. Each item is
signified with the <li> (List Item) tag. The syntax for this tag is:
<ol>
<li>first item
<li>second item
...
</ol>
For example:
<ol>
<li>Do this first
<li>Do this next
<li>Do this last
</ol>
This example produces
- Do this first
- Do this next
- Do this last
It is possible to change the type of count marks (e.g. 1 2 3 to a b c, etc...) through the type attribute
and the starting position through the start attribute.
There are five different types of count marks for use with the type attribute:
| type = A | | capital letters (e.g. A, B, C, ...) |
| type = a | | lowercase letters (e.g. a, b, c, ...) |
| type = I | | capital roman numerals (e.g. I, II, III, ...) |
| type = i | | lowercase roman numerals (e.g. i, ii, iii, ...) |
| type = 1 | | default numbers (e.g. 1, 2, 3, ...) |
The start attribute allows the list to be started anywhere within the list. For example, 'start = 5' would
start the list with number 5 (or whichever count mark is being used).
For example:
<ol type=I start=3>
<li>Open the file menu
<li>Click on 'save as'
<li>Type 'document.txt'
<li>Click 'OK'
</ol>
This would result in
- Open the file menu
- Click on 'save as'
- Type 'document.txt'
- Click 'OK'
An unordered list is used to present a list of items marked by bullet points instead of count marks. An
unordered list is created by using the <ul>...</ul> container tag. As with an ordered list, each list
element is denoted by the <li> tag. The syntax for an unordered list is the same as that of an ordered list.
An example of an unordered list is:
<ul>
<li>Item one
<li>Item two
<li>Item three
</ul>
- Item one
- Item two
- Item three
It is possible to change the shape of the bullet from the default disc to a square or a circle through the use of the
type attribute. The type attribute may be used in the <ul> tag, to change all the bullets, or
in the <li> tag, to change all bullets following that tag. For example:
<ul type=square>
<li>Item one
<li type=circle>Item two
<li>Item three
<li type=disc>Item four
</ul>
- Item one
- Item two
- Item three
- Item four
The last major type of list that is supported by HTML is the definition list. A definition list consists of
a list of terms followed by their corresponding definitions indented on the line below. A definition list is created
by implementing the <dl>..</dl> container tag. Each term is denoted by the <dt> (Definition list Term)
tag and, likewise, each definition is denoted by the <dd> (Definition list Definition) tag. The syntax for this
tag is:
<dl>
<dt>Dog
<dd>n. - a canine
<dt>Cat
<dd>n. - a feline
</dl>
- Dog
- n. - a canine
- Cat
- n. - a feline
Goto Lab