CS 110X Feb 10 2014
Expected Reading: 179-189
Expected Interactions: Loops modifying lists
Clicker: Assessment
You were lookin’ for that third three, but you forgot that Professor Green folded on Fourth Street and now you’re representing that you have it. The DA made his two pair, but he knows they’re no good. Judge Kaplan was trying to squeeze out a diamond flush but he came up short and Mr. Eisen is futilely hoping that his queens are going to stand up. So like I said, the Dean’s bet is $20.
Rounders, Matt Damon.
1 Completing The Parameter Discussion
1.1 Basic Value Assignment Redux
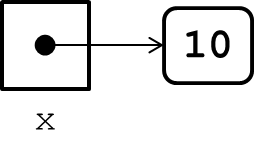
Last week, we addressed the simple case of variable assignment.
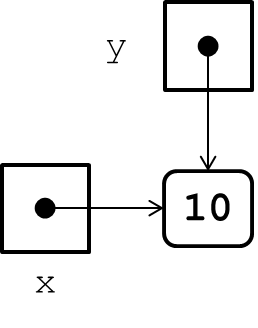
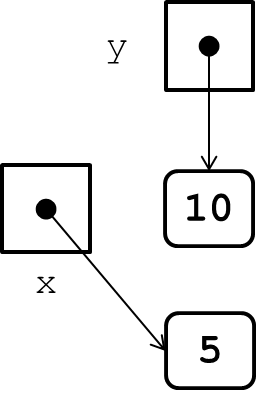
>>> x = 10 >>> y = x >>> x = 5 >>> y 10
You need to understand why the value 10 is printed.
Basic primitive types (int, float, bool) all follow this behavior. The assignment statement x = 10 means, "x gets the value of 10." At this point, x is associated with the value 10 and the variables in memory appear as follows:
The next statement y = x means, "y gets associated with the value that x is associated with." In Python, the following is the picture in memory:
When you then say x = 5, the result is that x now gets the value of 5 and y is unaffected.
If we had used the "Box View" of variables (where values are simply drawn inside the variable box) then the above sequence of events would not have been clear.
1.2 Dealing With List Assignment
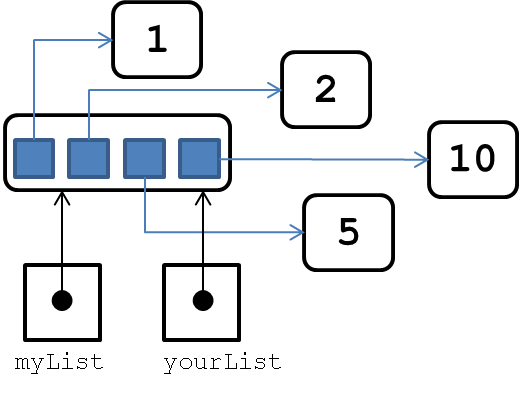
>>> myList = [1, 2, 5, 10] >>> yourList = myList >>> myList[0] = 99 >>> yourList [99, 2, 5, 10]
This behavior is different from the behavior with primitive values, and you need to understand it. Let’s start by drawing the appropriate figures. The myList = [1, 2, 5, 10] statement creates a list with four values as elements. The following diagram demonstrates the structures in memory.
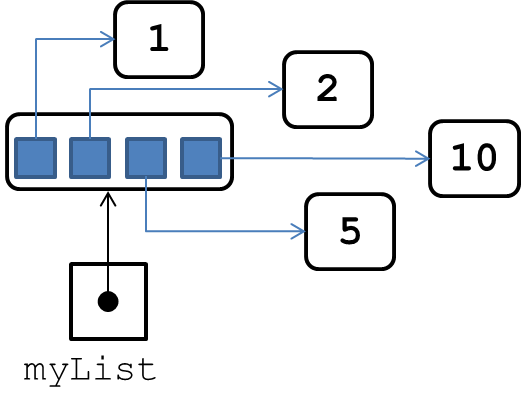
This is noticably different from the earlier figures I was drawing. Why? Because a list is an aggregate value; that list object maintains four references to four separate values, as shown above.
The above must be clearly understood when considering how to interpret the statement yourList = myList. I hope you hear my consistent answer when I say that "yourList gets the value associated with myList." With this in mind, the following image depicts the state of variables in memory:
As before with primitive values, both myList and yourList are associated with the exact same list value. When we were dealing with primitive values, this was not an issue, because primitive values are immutable and do not change once they are created.
However, you can append a value to a list. You can change an individual element of a list to become a new value.
So when the next statement executes, myList[0] = 99, the appropriate element in the list changes (from 1 to 99), but this change is visible through both myList and yourList.
See below:
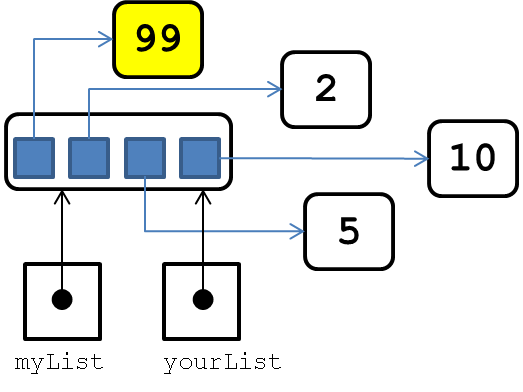
Accessing either myList[0] or yourList[0] results in the primitive value of 99. *WHEW*
1.3 Let’s Make Sure List Knowledge Is There
What does the following code do?
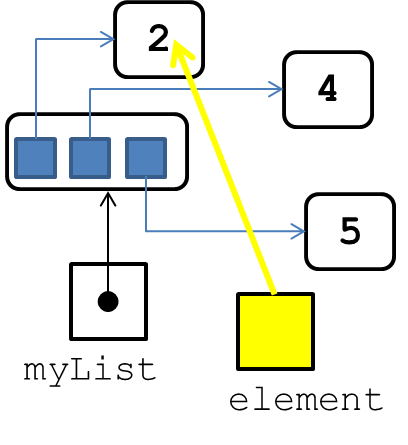
>>> list = [2, 4, 5] >>> for element in list: element = element * element >>> print (list)
Surprisingly, it does nothing! Review the following image, which shows the variables the first time the for loop executes.
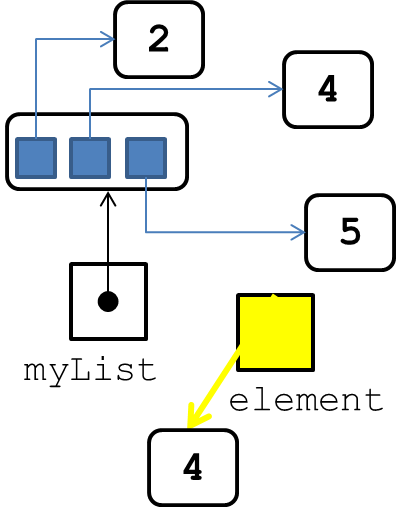
After the element = element * element statement executes, the following is the internal representation:
If you really wanted to take a list and replace each element with its square, then you would do the following:
>>> list = [2, 4, 5] >>> for idx in range(len(list)): list[i] = list[i] * list[i] >>> list [4, 16, 25]
Note how the above directly requests new values to be associated with each of the index positions in the list? Be sure you understand why this works while the previous code does not.
1.4 Passing Lists As Arguments To Functions
When passing a list to a function as an argument, the earlier observations continue to hold. Specifically, the formal parameter of the function "gets associated with the value that the argument is associated with." In this way, a Python function can modify the contents of the list.
1.5 Python is consistent
We can take this logic one step further. Imagine opening a file for reading, as we have seen before; this time we are going to read individual lines one at a time.
def showProblem(): inFile = open (’sample.txt’, ’r’) inFile2 = inFile line1 = inFile.readline() line2 = inFile2.readline() print (’line1 read: ’ + line1) print (’line2 read: ’ + line2) inFile2.close() # whoops! This won’t work because the file is closed line3 = inFile.readline()
The variable inFile and inFile2 refer to the same Python File object that is responsible for reading lines from the sample.txt file. This value (a Python File object) is refered to by both inFile and inFile2. For this reason, when the code above asks inFile2 to close the file, then inFile is no longer able to read information from the file because it has been closed.
1.6 Debug Challenge
There is a Python abs function that returns the absolute value of a number. Thus abs(-5.3) is equal to 5.3.
The following function should take in a list of values and modify that list in place such that every negative value is replaced with its absolute value.
Press To Reveal
Defects
1.7 Skills
DT-9: Know how to access and modify individual elements of a list
DT-10: Know how to iterate over elements of a list
1.8 Self Assessment
Given a list of string literals, find out how many times the value ’b’ appears immediately after the value ’a’.
Think of the different ways you have used the for loop and think the problem through before writing any code.
1.9 Arduino Demo
When I first designed this class, my first thought was "I want the students to write a Python program to interact with a Magnetic Card Reader." Yes, totally random, though not as off the wall as Kristen Bell and the Sloth.
The idea is that many of you are going to be working with embedded systems, such as medical devices or advanced electronic devices, and I wanted to at least get you familiar with the "wiring and plumbing" aspects of the problem. Also, as a tactile learning device, there is nothing more impressive than being able to demonstrate how your programs can interact with the world around you.
To download the Arduino development environment, visit their Download page. Note that you only need version 1.0.5 because I haven’t tested the new 1.5.5 version.
For this demonstration, I wrote the following Python program (morseCode.py). Note, you can’t run this without an Arduino board, but those will be provided to you in a few weeks during the labs after Exam 2.
# Morse Code program # # Allow user to type DOT/DASH... sequence to be delivered to # Arduino on which a separate program blinks an LED accordingly import serial # open communication to arduino over USB at 9600 baudrate # This is defined when the module is loaded out = serial.Serial("COM4", baudrate=9600) def process(word): """Process DOT or DASH and send signal to serial out""" if word == ’DOT’: out.write(’.’) elif word == ’DASH’: out.write(’-’) else: print ("ignoring " + word) def morseCode(): """Convert user input into signals to arduino board""" while (True): code = raw_input ("enter sequence of DOT/DASH with spaces: ") if code == ”: break words = code.split() for word in words: process(word) # Done with arduino communication. MUST close every time out.close()
You should be able to readily understand much of this code, because it relies on fundamental Python abstractions that you have used to date.
The only trickly part is the inner while loop, which converts strings of the form "DOT DASH DASH DOT DOT" into requests to send commands to the Arduino board through a USB Serial connection.
1.10 Version : 2014/02/11
(c) 2014, George Heineman