To install the EclEmma plugin, follow the instructions on their web page.
Once you have downloaded and installed Eclipse, you will do all of your development within a workspace. Create one by selecting "Switch Workspace...". Alternatively, when you start Eclipse for the first time, you will be prompted to create a workspace. The default location is "c:\Documents and Settings\User\workspace" which is ok.
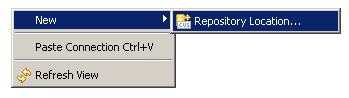
To access CVS from within Eclipse, open "Window --> Open Perspective --> Other..." and then select "CVS Repository Exploring". Once done you will need a CVS location. The course SourceForge CVS location is added by right clicking the mouse in the CVS panel on the left and choosing to add a new repository location
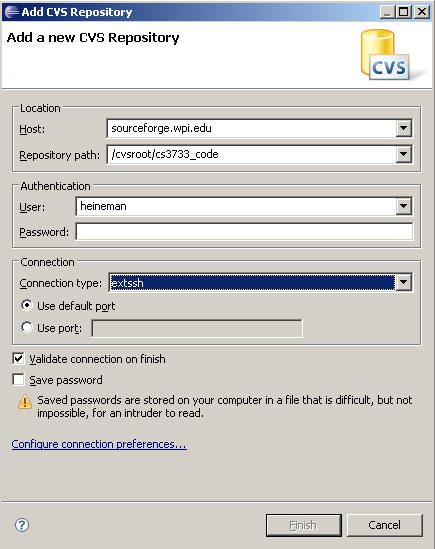
The details you need are shown below. Make sure you select "extssh" as the connection type and use your own CCC user account name! I always leave the password blank (for security reasons). You will be prompted with it later.
Once you have connected to the repository, you can browse to find the projects that you are to retrieve.
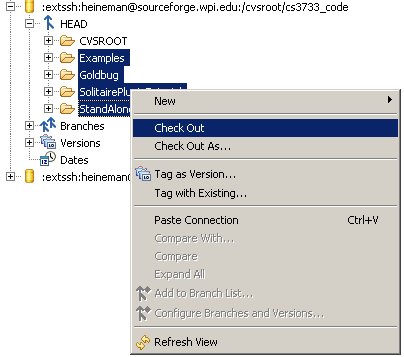
Select all folders (except for CVSROOT) by using the mouse, and then right-click to ask to "Check Out ..." the projects. These will then be added to your Eclipse workspace.
All code examples are made available through a web-based enterprise code
management system called SourceForge. Point your browser to
http://sourceforge.wpi.edu and you can
login using your CCC unix account and password. If you are encountering
difficulties in connecting to sourceforge (it has been known to happen) then
read this short
solution. If you browse the available list of public projects, you will see
CS2102. Alternatively, once you have logged in, type the following in the
Browser Address:
https://sourceforge.wpi.edu/sf/projects/cs3733_heineman. You will see the main
project page, and there will be a button "Join This Project" ( )
which you should click on. I have to accept all requests, so there may be a
delay of up to 12 hours.
)
which you should click on. I have to accept all requests, so there may be a
delay of up to 12 hours.
You can create your own shared repositories on the CCC machines using the following web-based form. You must login using your CCC user name and password. From this form, you will be able to create a group by name and add up to five members to the group.
Once you have the group set up (and have waited 5-10 minutes to let the changes propagate throughout the CCC cluster machines) then you can have someone create the CVS repository within their home directory. It is imperative that the file information be made available to all group members (otherwise they won't be able to update the files, only the original creator will). In the following, I use "student1" and "student2" as the user accounts. I use 'newgroup' as the group created using the form. I recommend doing the following steps:
1. Create the cvs repository within student1's home directory
You can give it any name you want; here I call it "Repository". I assume that student1 is issuing these commands.
 % cd ~student1
 % cvs -d $PWD/Repository init
2. Ensure that the permissions are properly set for the directory
First make sure that the file has 0x775 permissions to enable group access
 % chmod 755 Repository
 % ls -dl Repository
 drwxrwxr-x 3 student1 1385 4096 Mar 10 19:36 Repository/

 % chgrp -R newgroup Repository
 % ls -dl Repository
 drwxrwxr-x 3 student1 newgroup drwxrwxr-x 3 student1 newgroup 4096 Mar 10 19:36 Repository/
3. Ensure that all newly added files will have the right permissions as well
This is done using the 'sticky' permissions bit on Unix. Note the extra 's' in the output% chmod -R g+s Repository drwxrwsr-x 3 student1 newgroup 4096 Mar 10 19:52 Repository/Now, files that are created within the subdirectories of Repository will default to 'newgroup' group ownership, thus enabling entire group to access it.
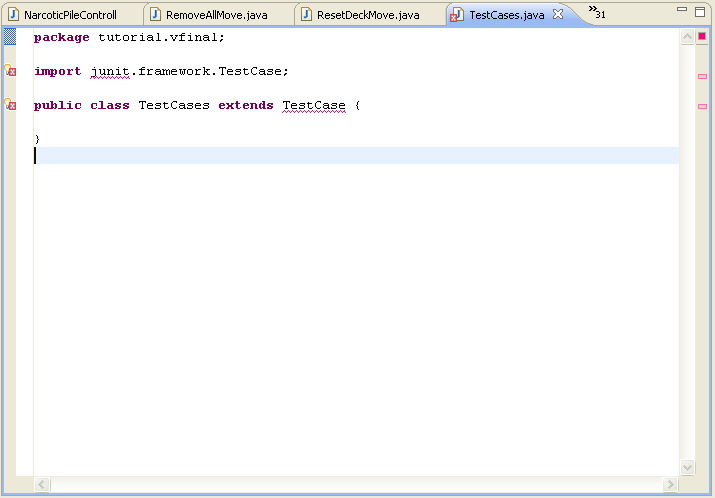
To create your first JUnit test case, Select New --> JUnit Test Case from the menu you see when you right-click on the Eclipse Project within which you are coding. For this small explanation, I show how I wrote my first test case (as part of A1.correctness) for Narcotic.
You may see something like this:
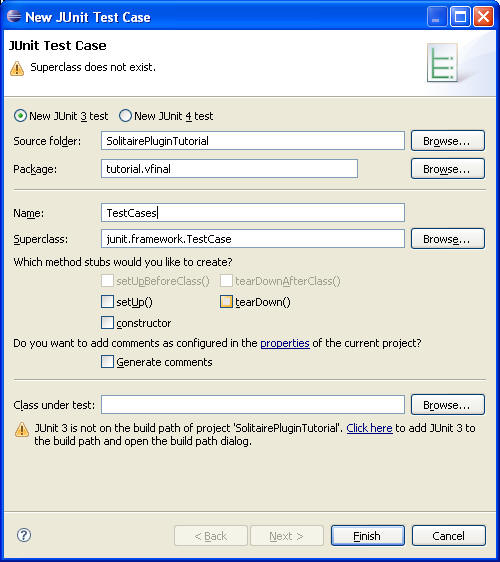
Ignore the errors and warnings for now. I just give the JUnit test case a name and click on Finish. You will see the following class appear:
The errors (if they appear) can easily be fixed by left-clicking on the red X by the import statement to bring up a proposed solution:
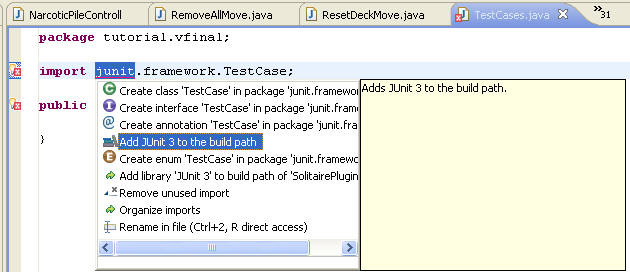
Select "Add JUnit 3 to the build path" and watch the compilation errors vanish. Note that this action need be performed only once, and it is likely already done on the Project in the repository so you may not have to do this. However, it will be needed for the new projects you create.
There are several on-line tutorials showing how to write JUnit test cases within eclipse [tutorial1, tutorial2]. I will present the essential requirements in class.
A JUnit test case is actually a public method within this class that returns void and starts with "test" in lower case letters. Let's assert a test case that ensures that when the NarcoticFinal variation initializes that it has properly dealt one card to each of the four piles. To the "TestCases" class, add the following method:
public void testInitialDeal() {
	// Seed is to ensure we get the same initial cards every time.
	NarcoticFinal nf = new NarcoticFinal();
	GameWindow gw = Main.generateWindow(nf, 117);

	assertFalse (nf.pile1.empty());
	assertFalse (nf.pile2.empty());
	assertFalse (nf.pile3.empty());
	assertFalse (nf.pile4.empty());
}
Now, right click on the TestCases.java icon in the Project area and select "Run --> Run As JUnit Test". You will see a panel on the left with the following information:
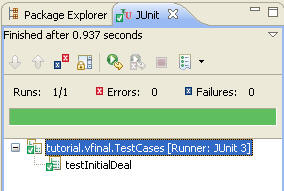
which shows that there was 1 test case and that it was successful. During A1.correctness, you will be designing a number of test cases that you can write here without actually having the proper working code in place! That is, you will only be able to run the test cases once the implementation is complete.
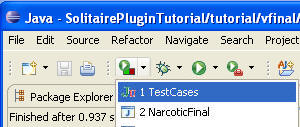
Because we actually have a working implementation, let's see what the code coverage is for this particular test case. I assume that you have installed the EclEmma plugin. You can see the menu bar at the top in which there is a small green circle with a small green box and red box. Left click on the small triangle to pull up the list of recently executed applications and test cases, and you will see "TestCases" as the first entry; select it
The same test case executes as before, but this time a new tabbed pane appears with coverage information at the bottom of the Eclipse window. Expand to locate "tutorial.vfinal"
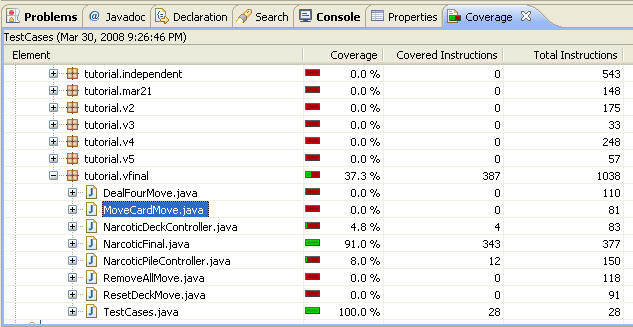
We have shown some base coverage (primarily of the Plugin subclass). When you inspect the classes within the Eclipse editor, you will see lines hilighted in GREEN which executed and RED lines that did not. Your goal is to develop a set of test cases that exercise all of the moves properly (and the controllers as well). This is a challenge! In this tutorial I show two strategies you should follow with testing: Testing Individual Moves and Testing Controllers.
How should we test the DealFourMove class? Well, we need to construct an instance, and validate its methods: valid, doMove, and undo. The following test case comes close. It shows how to construct the game and instantiate a move to be validated, executed and undone. Note its use of the specially prepared deck which uses seed "-1". There is another specially prepared deck using seed "-2" which could also be used.
public void testValidDealFourMove() {
	// Seed is to ensure we get the same initial cards every time.
	// -1 is the seed which returns deck in order of RANK. That is
	// FOUR aces are on the bottom and FOUR kings are on the top.
	// order of cards is Clubs, Diamonds, Hearts, Spades.
	NarcoticFinal nf = new NarcoticFinal();
	GameWindow gw = Main.generateWindow(nf, -1);

	DealFourMove dfm = new DealFourMove(nf.deck, nf.pile1, nf.pile2, nf.pile3, nf.pile4);
	assertTrue (dfm.valid(nf));

	// know where we are
	assertEquals (1, nf.pile1.count());
	assertEquals (1, nf.pile2.count());
	assertEquals (1, nf.pile3.count());
	assertEquals (1, nf.pile4.count());

	// make move.
	dfm.doMove(nf);

	// assert results.
	assertEquals (2, nf.pile1.count());
	assertEquals (2, nf.pile2.count());
	assertEquals (2, nf.pile3.count());
	assertEquals (2, nf.pile4.count());

	// be even more precise.
	assertEquals ("QS", nf.pile1.peek().toString());
	assertEquals ("QH", nf.pile2.peek().toString());
	assertEquals ("QD", nf.pile3.peek().toString());
	assertEquals ("QC", nf.pile4.peek().toString());

	// undo move
	dfm.undo(nf);

	// be even more precise.
	assertEquals ("KS", nf.pile1.peek().toString());
	assertEquals ("KH", nf.pile2.peek().toString());
	assertEquals ("KD", nf.pile3.peek().toString());
	assertEquals ("KC", nf.pile4.peek().toString());

}
With this test case, you will note that the coverage of DealFourMove now becomes
96.4%, well above the desired threshold. To make it 100% you will have to invoke
it when it is not valid, though by inspection of the move class one can validate
this is appropriate. As I mentioned in class, the goal is not always to reach
100% but to ensure that you have properly demonstrated the workings of the
class.Testing controllers will take some additional work. You may have to set up the game, too, to make things happen. The following test case shows how to test the drag of a card from one pile to another. Note that instead of properly dealing out cards, we directly modify the model using a helper class provided for you called ks.tests.model.ModelFactory which can be found in the StandAlone project (you MAY have to update StandAlone to retrieve it). I let the documentation speak for itself. First, I write some helper methods within TestCases to generate mouse events that I may need to deal with (note that these DO NOT start with 'test' otherwise they might be confused for being test cases
	/** (dx,dy) are offsets into the widget space. Feel Free to Use as Is. */
	public MouseEvent createPressed (Solitaire game, Widget view, int dx, int dy) {
		MouseEvent me = new MouseEvent(game.getContainer(), MouseEvent.MOUSE_PRESSED,
				System.currentTimeMillis(), 0,
				view.getX()+dx, view.getY()+dy, 0, false);
		return me;
	}

	/** (dx,dy) are offsets into the widget space. Feel Free to Use as Is. */
	public MouseEvent createReleased (Solitaire game, Widget view, int dx, int dy) {
		MouseEvent me = new MouseEvent(game.getContainer(), MouseEvent.MOUSE_RELEASED,
				System.currentTimeMillis(), 0,
				view.getX()+dx, view.getY()+dy, 0, false);
		return me;
	}
Finally, we need to generate a mousePress within one widget and mousePress within another widget. Here is the full test case:
	public void testMoveCardMove() {
		NarcoticFinal nf = new NarcoticFinal();
		GameWindow gw = Main.generateWindow(nf, 115);

		// Replace content of pile1 and pile2 with these five cards.
		ModelFactory.init(nf.pile1, "3C 4S 5H");
		ModelFactory.init(nf.pile2, "7S 5D");

		assertEquals ("5H", nf.pile1.peek().toString());
		assertEquals ("5D", nf.pile2.peek().toString());

		// Generate a mouse press on the widget image (inset by 10x10 pixels).
		MouseEvent press = createPressed (nf, nf.pileView2, 10, 10);
		nf.pileView2.getMouseManager().handleMouseEvent(press);

		assertEquals ("5H", nf.pile1.peek().toString());
		assertEquals ("7S", nf.pile2.peek().toString());

		// Generate a mouse release onto pile1
		MouseEvent release = createReleased (nf, nf.pileView1, 10, 10);
		nf.pileView1.getMouseManager().handleMouseEvent(release);

		// move is made.
		assertEquals ("5D", nf.pile1.peek().toString());
		assertEquals ("7S", nf.pile2.peek().toString());
	}
You are now on your own. Look to the A1.correctness format to see what is expected of you.