| Objective: |
THIS PROJECT SHOULD BE DONE IN GROUPS OF TWO OR THREE!
This project is designed to allow you to apply what you have learned in this course to produce an interactive experience (e.g., a game) that
incorporates an appropriate amount and type of input and output.
|
|
| Where to get parts |
If you need common components, you can go to the ECE shop in Atwater-Kent, Room 112. They have lots of small
parts, such as all kinds of resistors, capacitors, etc. They know you are coming. You will need to pay them (cash)
for the parts you need. Also, there are links at the bottom of the course Web page to other sources of parts.
|
|
| What to do: |
The project objective is for you to understand the delicate balance between the device(s) used for a given application, and the
constraints on the application, such as the characteristics of the target users, the environment in which the task will be performed,
and task-specific traits.
There are some basic requirements for the projects, regardless of what your actual project idea is.
- You must incorporate the Arduino into some part of your project
- You must include a non-Arduino piece of the project that the Arduino communicates with
- You must include input to the system that uses two user modalities (e.g., joystick and voice)
- You must include output to the user that uses two sensory modalities (e.g., visual and sound)
- You must choose mappings of inputs to game-controls, and outputs to game-state, that make sense
|
|
| Final Prototypes: |
Here are blurbs for each of the projects. Keep in mind that the teams only had about
4 weeks to go from idea to prototype.
| FINAL PROJECTS |
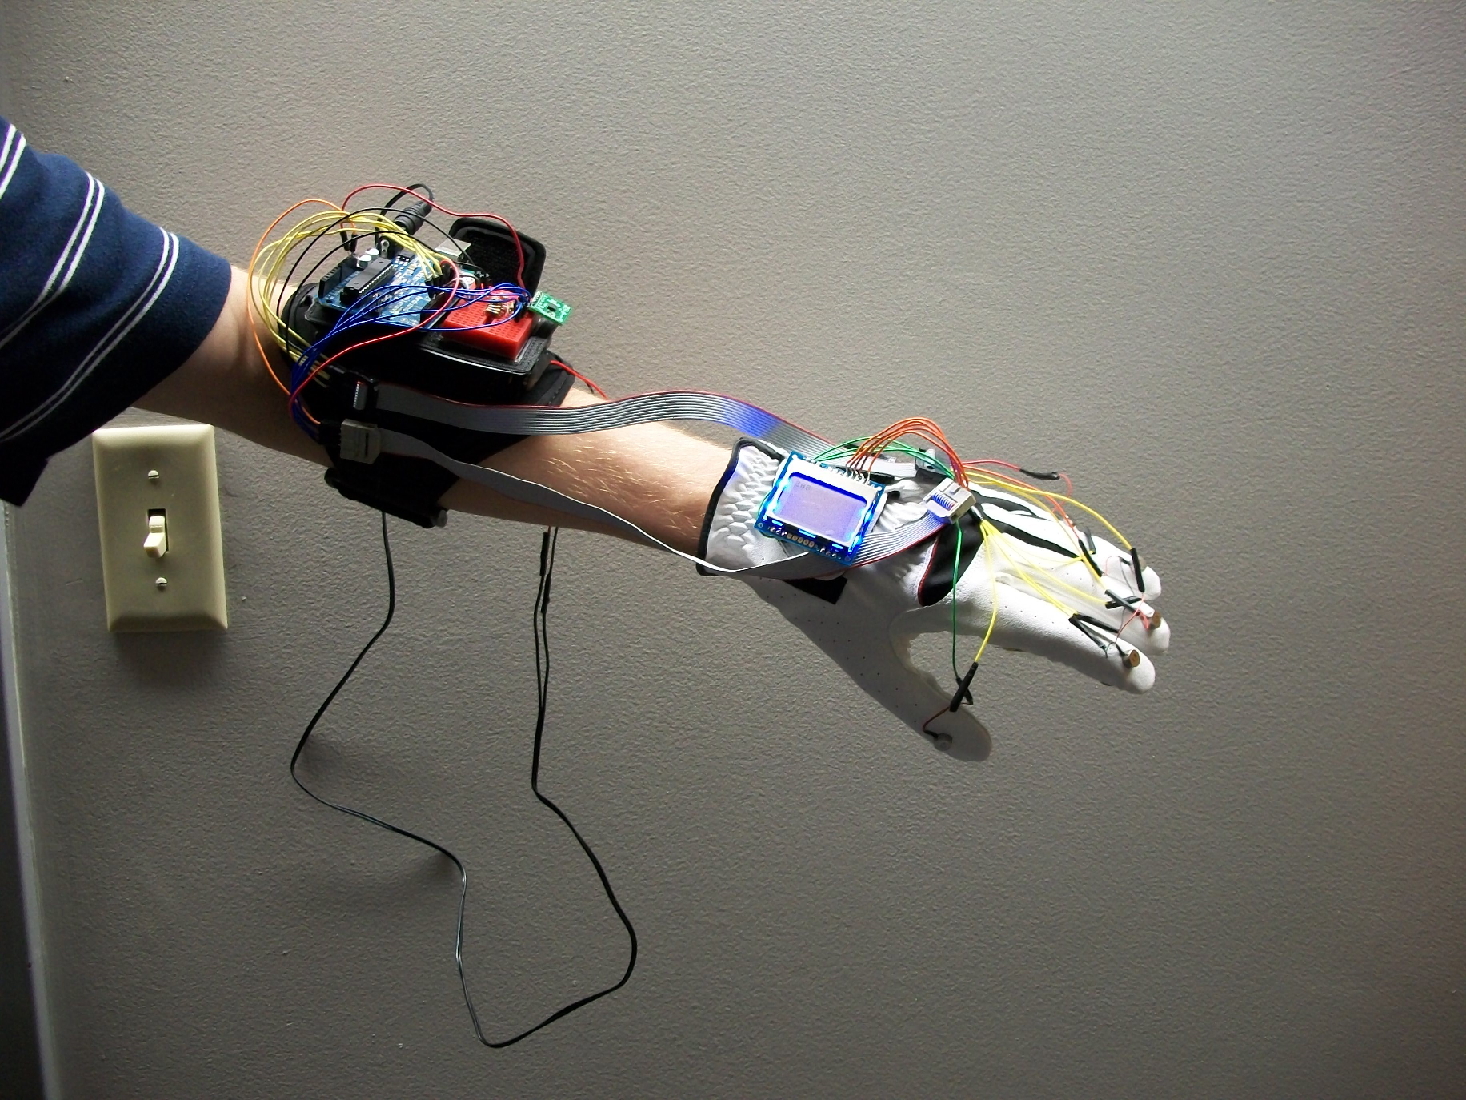
Infinite Bubble Wrap

Team:
Chris Aloisio
Ryan Casey
|
Game Blurb:
Infinite Bubblewrap is a game made to be played on our custom glove-based, tactile controller made based off
the Arduino that gives you the sensation of popping as much bubblewrap as you could ever want without the need
for actual bubblewrap. We worked over the past 4 weeks on creating this custom interface for our Human Computer
Interaction for Real, Virtual, and Teleoperated Environments course at Worcester Polytechnic Institue.
Device Usage:
This game first works off a system of force sensing resistors on each finger. It senses when you make a
squeezing motion with your thumb and any other finger, simulating the popping of a bubble. Motors on the
given finger then vibrate, giving you tactile feedback in proportion to the pop. Infinite Bubblewrap includes
four game modes in which you must pop bubbles in various different ways. These modes make use of the built-in
accelerometer to get further user input and also of the hand-mounted LCD to give the player feedback based on
the game mode they are playing.
Other Stuff:
Project Website
YouTube Video of the Project
|
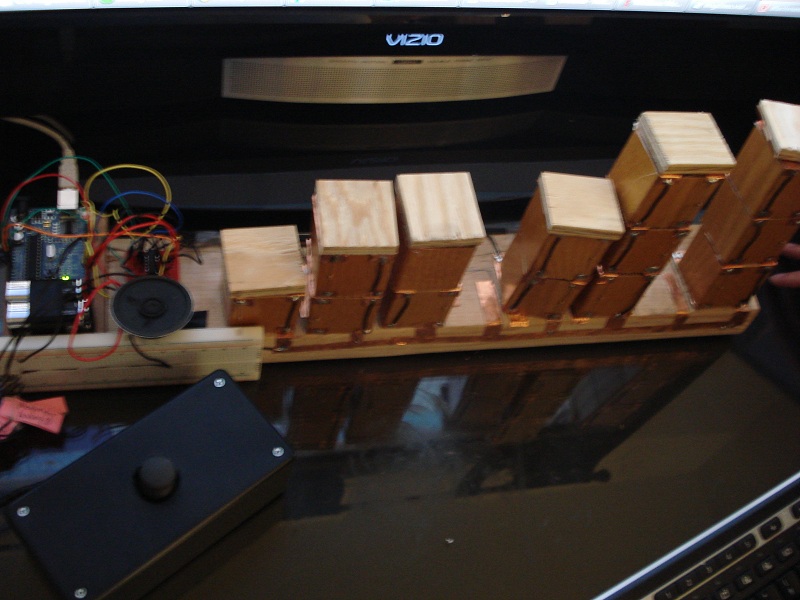
Tangible Level Editor

Team:
Elliot Brodzki
Anas Maghfur
Rick Pianka
|
Game Blurb:
The tangible level editor is a proof-of-concept project that uses an arduino, a multiplexer and a series of resistors
to determine how blocks are stacked. The data is fed into the Unity game engine to provide input to a 2d platformer
game. The idea is that the user can viscerally construct or design a level in the real world and it will already exist in
a virtual world. This type of interface could have a broad range of applications.
Device Usage:
Wooden blocks are stacked along a board. The board has eight slots where stacks can be placed. The block configuration
is read into the game, and the player can then play the level using a single joystick controller we made.
Other Stuff:
Project Website
YouTube Video of the Project
|
Bleeding Out!

Team:
Stephen Heitman
Timothy Kolek
|
Game Blurb:
Bleeding Out! is a top-down game where your character has been shot in the shoulder, and because of the general public's
blatant disregard for your well-being, you have to limp the 10 blocks to the nearest hospital. You have about 70 seconds
to live, evidenced by the speaker which simulates your heart beat.
Device Usage:
Control your character with the Wii Nunchuk joystick, moving left and right to avoid obstacles, and forward to advance
towards your destination. Utilize the Nunchuk motion combined with the C and Z buttons to dodge (read: move quickly)
previously unavoidable situations. As a player, you wear a blood pressure cuff outfitted with five vibration motors that
indicate how much blood you're losing. Avoid as many obstacles as you can, but you can run into four objects and still
make it to the hospital alive. For each object you hit, a vibration motor turns on, up to a maximum of five (at which
point you die).
Other Stuff:
Project Website
YouTube Video of the Project
|
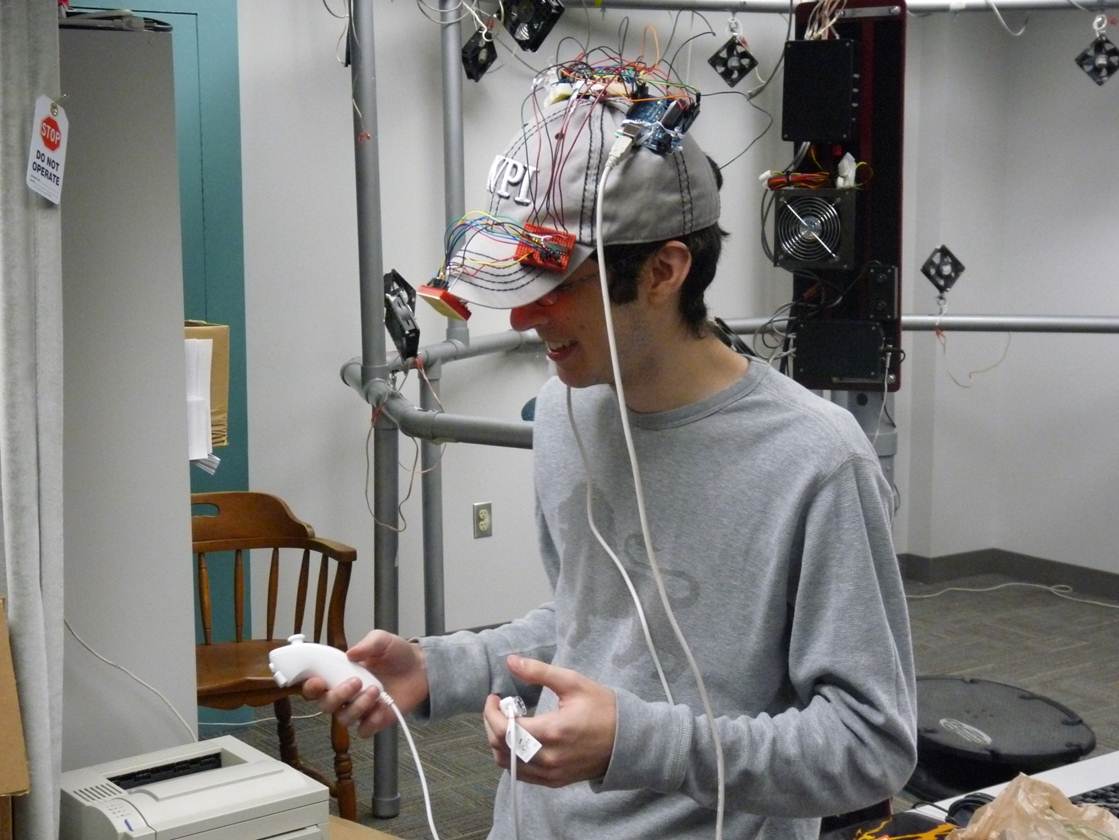
Blind Man's Last Stand

Team:
Dylan James
Kyle Sarnik
Chris Williams
|
Game Blurb:
There are a never-ending hoard of zombies advancing on your position, except you cannot see them and you cannot flee.
Zombies approach the player from all directions at regular intervals. The player has to kill the zombies before they
reach his position, or else he will take damage. The player cannot move and he cannot see the zombies. Instead, the
player must rely on other senses to locate where the zombies are. The player can only attack in a small cone in front
of him, so he must rotate in-place in order to face the zombies before attacking. The goal of the game is to last as
long as possible. Zombies will always triumph in the end.
Device Usage:
There are five vibration motors attached to the inside of the hat. When the player dons the hat, there will be three
motors resting on the front of the player's head and two motors that will be on the back / sides of the player's head.
When zombies approach, the motor in the direction of the zombie will begin to vibrate. The closer the zombie gets, the
more the motor will vibrate. If a zombie is positioned in-between two motors, the total power will be distributed between
them. This allows the player to perceive where the zombies are around him and how close they are to him.
There is a 1-axis gyro located on the top-middle of the hat. It allows us to measure the rotation of the player's head. This
allows the player to rotate his avatar in the game world. A nunchuck is used for attacking monsters. The player can swing
the nunchuck, which initiations an attack in the direction the player is facing. A ten-segment display is attached to the
rim of the hat. It is used primarily to display the health of the player. It is also used to display cool effects when the
game is starting up and the player is dying. A buzzer is used to provide audio cues when the player kills a monster, takes
damage and dies.
Other Stuff:
Project Website
YouTube Video of the Project
|
Sonic Boom

Team:
James Sturges
Michael Wall
|
Game Blurb:
Sonic Boom, a 2-D top-down racing game, is our final project. The player controls a car and tries to navigate it
around a track without falling off. The game uses two forms of input: a joystick to control the direction the car
is moving, and a microphone which triggers a large but very short speed boost on the car when it detect a loud
noise, such as the player yelling into the microphone. It also uses two forms of output: a speaker which beeps every
fifteen seconds to indicate that fifteen seconds have elapsed since the last beep, and which may also cause a boost,
and a fan which spins fast depending on the speed the car is moving, spinning fast when the boost is active.
Device Usage:
The physical circuit uses the circuit for a microphone, which is simple, and an amplifier, which is complicated. It
uses a larger variety of physical pieces than anything we had ever seen, and was a tremendous obstacle. The microphone
was simple to hook up, since it is functionally two potentiometers. The speaker fit nicely onto the breadboard and
required nothing special either. The fan, requiring more power than the 5Vs it could be given from the board, required
an external battery to get power. It would have constantly been given too much power, so a PWM slot was used to control
how much power it recieved.
Other Stuff:
Project Website
YouTube Video of the Project
|
|
|
Attacking
the Problem: |
As this project is of significant size, the best way to attack it is by dividing the work amongst your teammates.
One possibility is to have one person focus on the I/O devices, and the other on the host code (e.g., the game).
This project will reqiure constant attention, if it is to be delivered on time. To this end, there will be three in-class
status updates at which you will present the work you have done to date, along with a discussion of problems you are having.
|
|
| What to Submit: |
All documents are to be submitted electronically via turnin by 11:59 pm
on Tuesday, October 12, 2010.
The following items should be submitted for this project:
- The code for the project
- The schematics for the devices
- Photographs of your device and Arduino circuit (you can get a digital camera from the ATC for this)
- A video of your project in action. This you should plan to upload to YouTube
- A brief report on problems encountered during the implementation of the project
and what approaches were used as final solutions.
- Also, please provide a brief descriprion of what each person did.
- Finally, please put up a simple Website about your project. This will allow people to see what you
are doing, and will also force you to think in terms of putting together a description to add to your
IMGD portfolio.
Name each file something that makes sense.
When you are ready to submit, zip up all your files into a single archive file.
Name your file ProjectName_finalproject.zip.
Only one submission per team is necessary.
You will use the new Web-based "Turnin" facility to submit your work. Information
about submitting can be found here:
http://web.cs.wpi.edu/~kfisler/turnin.html.
Your WPI user ID should be used to login, and you should have been emailed a password.
The Turnin assignment ID is final.
|
|
Academic
Honesty: |
Remember the policy on Academic Honesty: You may discuss the
project with others, but you are to do your own work. The official WPI statement
for Academic Honesty can be accessed
HERE.
|
|
Projects from
Previous Years: |
- Final Projects from 2009
|