Most programs run directly on your computer. A Java applet is a special kind of program that runs inside a web browser. The Applet class does what's needed to make that work.
Let's look at a bare-bones applet. This applet will just put a gray box on the screen.
GrayBox.javaCheck this code
import java.awt.*;
import java.applet.*;

public class GrayBox extends Applet
{
}
Let's look at this program line by line. The first two lines are:
import java.awt.*;
import java.applet.*;
We use the import keyword to get some
things needed for our applet from other files. Importing
java.awt.* gets all of the things needed for drawing on
the screen in Java. Doing the same with java.applet.*
gives us all the things we need to build applets. Now
let's look at the next line.
Thepublic class GrayBox extends Applet
class keyword is used whenever we
define a new type of object.
The syntax for defining a new class is:
GrayBox is the name of our new class. It extends, or inherits from, Applet. The Applet class sets up a skeleton which we fill in to create Java applets. By inheriting from class Applet, we get some functions that we can use.public class NewClassName extends ExistingClassName
We can change the functions we inherited from the Applet class to have our class do more than it does by default. This is called overriding the functions. Two important functions we will override in our applet are init and paint.
import java.awt.*;
import java.applet.*;

public class GrayBox extends Applet
{
    public void init() {
        // Do one time setup stuff
	}
    public void paint( Graphics g ) {
        // Draw the screen
	}
}
Once we have our applet skeleton in place, we'd like to make our program do something. So let's start simple. Let's take a look at the classic "Hello, world!" program done as a Java applet. This program puts the words "Hello, world!" on the screen.
The paint function is called automatically every time our applet needs to draw itself. In JavaBOTL, even a blank program still drew stuff on the screen. If we want our Java applet to draw anything, we have to code it ourselves. The place we do this is inside the paint function.Check this code
import java.awt.*;
import java.applet.*;

public class Hello extends Applet
{
    public void init()
    {
    }

    public void paint( Graphics g )
    {
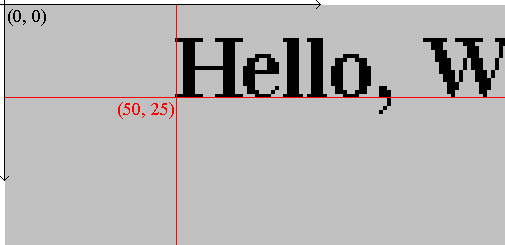
        g.drawString("Hello, World!", 50, 25 );
    }
}
The paint function of our applet has a parameter named g that is of type Graphics. We can use this parameter within the paint function. The Graphics class contains the tools we'll need to draw inside an applet's window. We use the Graphics g parameter as our "graphics toolbox".public void paint( Graphics g )

We can use the Graphics class to draw words, lines, shapes, or images. Our "graphics toolbox" has drawing functions that do these things. We will be using the drawString and drawLine functions.
To select which "tool" to use, we use the standard ObjectName.FuctionName syntax. For example, the line of code now added to our paint function uses the drawString tool from our "graphics toolbox".
public void paint( Graphics g )
    {
        g.drawString( "Hello, World!", 50, 25 );
    }
The drawString function is one of the functions defined in class Graphics. It draws a string on the screen. A string is a word or phrase surrounded by double quotes. The string in our example is "Hello, World!". The drawString function takes three parameters. The first is the string we want to draw on the screen. The second and third are the x and y coordinates for where to start drawing.

Putting "Hello, world!" on the screen is a good start, but we'd like to do something a bit more interesting. This program shows how to draw straight lines on the screen.
Check this code
import java.awt.*;
import java.applet.*;

public class ShowLine extends Applet
{
    public void init()
    {
    }
    public void paint( Graphics g )
    {
        g.drawString( "Check out this line!", 50, 25 );
        g.drawLine( 50, 35, 150, 35 );
    }
}
The only thing that's different here is the new line in the paint function.
g.drawLine( 50, 35, 150, 35 );
The drawLine function is another tool from our "graphics toolbox". To use it, we do almost the same thing we did with drawString. The difference is that with drawLine, the parameters are two pair of x and y coordinates, which represent the start and end points of the line.
Now that we know how to use the paint function, let's take a look at another important part of our applet skeleton -- the init function. Let's take a look at a program that shows how to use the init function.
The init function is called automatically. It is called when an applet starts, before anything else.Check this code
import java.awt.*;
import java.applet.*;

public class BigX extends Applet
{
    public void init()
    {
        resize( 250, 300 );
    }

    public void paint( Graphics g )
    {
        g.drawLine( 0, 0, 250, 300 );
        g.drawLine( 0, 300, 250, 0 );
    }
}
If we look at the applet skeleton, we see that all one-time set-up stuff is done in this funtion. Above, we use the init function to set the size of our applet window. We do this by using the resize function.public void init()
The resize function takes two parameters. The first is the width (in pixels) that we want for our applet window. The second is the height. Our example uses the resize function to make the applet window 250 pixels wide and 300 pixels high. In the paint function we use drawLine to draw an 'X' over the entire applet window by using these values.resize( 250, 300 );
The nice thing about applets is that they run on the client side. The browser downloads the applet to your local machine and runs it there. The speed with which an applet is run, is relatively high, as it will be running in your browser.
An applet exists as compiled bytecode (mostly) on some computer connected to a network anywhere in the world. As soon as your browser downloads the applet, the browser's Java interpreter interprets the bytecode and executes the bytecode instructions.
As a simple illustration:
Server side:
As an example, let's use the BigX.java file as described above. Thejava code (*.java)--> Compiler--> Compiled Bytecodes (*.class file)
javac command is used to create a bytecode file as follows:
> ls
     BigX.java

> javac BigX.java

> ls
     BigX.class     BigX.java
applet tag. The
syntax for this tag is as follows:
<appletbasecode="applet url"code="applet filename"width="pixel width"height="pixel height">alt="alternate text"name="applet name"align="alignment"vspace="vertical pixel space"hspace="horizontal pixel space"><param name="parameter1" value="value1">
...
<param name="parameterN" value="valueN">
alternate HTML
</applet>
The codebase attribute is optional. It specifies
the
base URL or pathname of the applet specified in the code attribute.
The code attribute is required. It specifies the
file that
contains the compiled Java code for the applet. If the codebase attribute is specified, the code must be located relative to that location.
The width attribute is required. It specifies the
initial width in pixels that the applet needs in the browser's window.
The height attribute is required. It specifies
the
initial height in pixels that the applet needs in the browser's window.
The alt attribute is optional. It specifies text
that should
be displayed by browsers that understand the applet tag but do not support Java.
The name attribute is optional. It gives a name
to the applet
instance. Applets that are running at the same time can look each other up by name and communicate with each other.
The align attribute is optional. It specifies the
applet's
alignment on the page. It behaves just like the align attribute of the img tag, and should support at least the same alignment values that the img tag does. These values inlcude: top, middle, and bottom.
The vspace attribute is optional. It specifies
the margin in
pixels that the browser should put above and below the applet. It behaves just like the vspace attribute of the img tag.
The hspace attribute is optional. It specifies
the margin in
pixels that the browser should put on either side of the applet. It behaves just like the hspace attribute of the img tag.
The <param> tag, with its name and value
attributes,
specifies a named parameter and a string value that are passed to the
applet. These parameters function like environment variables or command
line arguments do for a regular application. An applet can look up the
value of a parameter specified in a param tag with the
Applet.getParameter() method. Any number of parameters can be
included for an applet.
If a web browser does not support Java and does not understand the
applet
tag, it will ignore the applet and its parameters and will simply display any text that appears in the alternate-html field.
Example:
<applet
   code="myTextApplet.class"
   width="300"
   height="200"
>
   <param name="message"
          value="Frontiers in Computer Science">
   <param name="font"
          value="Courier">
   <param name="point size"
          value="25">
</applet>