Review of Faces and Skin presentation
By:
(All images used without consent)
The first presentation I gave was on the current rendering and creation techniques of faces and skin. The bulk of my presentation was focused on one specific paper “Synthesizing Realistic Facial Expression from Photographs” [1]. This paper discussed a technique for creating realistic 3D faces from 2D images. It also discussed how to use different renderings of the same head with different facial expressions to interpolate new facial expressions for the same head.
The goal of my lecture on faces was to present different and current techniques on rendering realistic human faces. The creation of these realistic faces from geometric renderings is found to be almost impossible. This is because the structure of the human face is to complex to render geometrically. Every human face has many different details (wrinkles and creases) that are hard to represent through geometric shapes. To be able to render a human face geometrically would take thousands of control point, and even then may not look realistic to the human eye. Beyond the problem of representing a single model of a face is the problem animating a face. Animation of a face is complicated by the underlying structure of a human head. The different skeletal and muscle structures in a face allow for numerous different contortions in the movement of a face. Even though all of these different complications make rendering a face hard, the largest problem is our ability to read facial expressions. A statement from [1] explains this well “…no facial Turing test has ever been passed.” No computer has ever been able to generate a human face accurately enough to trick the human eye into thinking the face is real.
The process discussed in [1] to create realistic facial expressions deals with the combination of 2D morphing and 3D transformations of a geometric mesh to create realistic facial images. The method discussed in this paper takes multiple captures of a face from different angles and will use these images to map create view independent or dependent model of the face. The texture map is created by the blending of different initial images. We then apply this texture map too a generic geometric mesh of a face which has been modified to resemble the shape of the participants face using specifically chosen corresponding points throughout the images.
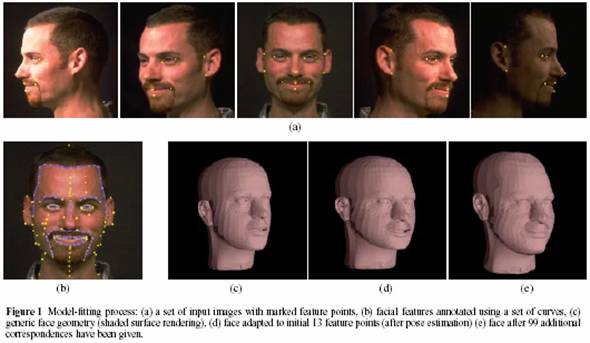
The process begins with the capturing of multiple points of view of an individuals face with a given facial expression. Once these images are digitalized we mark a small set of corresponding points in each. The points chosen are usually taken from around the eyes, mouth and ears. These points allow us to retrieve the parameters of the camera (focal length, orientation, position) for each image, which is done using computer vision techniques. With this information gathered for each image we are able to determine the 3D positions of each point in space. With this 3D information the next step is to construct a geometric head to model the images on.
Every model starts from a generic geometric mesh of a head. The points that have been determined in 3D space are used on the generic model to modify the mesh to the shape of the particular participants face. It is at this point that more corresponding points may be added to refine the fit. Then the rest of the points on the generic model are interpolated throughout the rest of the model. Below in Figure 1 (a) you can see the control points chosen displayed in each image. You can also see the change in the generic mesh as the modification are made based on the 3D coordinates of the control points in Figure 1 (c, d, e). Figure 1 (b) shows how the model can be further refined using corresponding curves in the images.
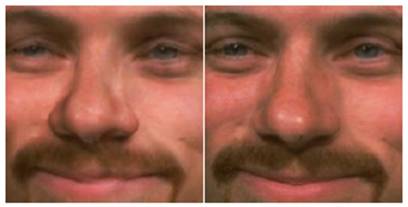
Once the shape of the head is determine the next step is to create the texture map that will be mapped to the geometric mesh. To create the texture map each corresponding point within the different images are compared to determine how they should be blended together to create the corresponding pixel value for the image to be generated. There are two different approaches considered when creating texture maps, view-independent blending and view-dependent blending. View-independent blending is the creation of a single texture map that can be used to map the face from any viewpoint. View-dependent blending is the creation of a texture map in which modifies blending weights for each pixel depending on the current view point.
The weight function is dependent upon the four specific criteria. The first of which is self-occlusion which determines how visible each spot from the initial images are in the image to be generated. Second is the smoothness of the transition of the weight map from each input image that contributes to the image to be generated. Next is the positional certainty which is determined from the cross product of the normal at a point p and the k-th image’s direction of projection. This determines which points are in better sight of the viewing angle. Lastly is view similarity which is used for view-dependent texture mapping, and contributes to the weight by comparing the direction of project of the initial images and the new view.
For view-independent mapping we use a cylindrical shape to model the texture map. To determine the viewable point on the texture map with create a feather map that is used to find the visible points. The feather map set a one for the visible points and a 0 for the points that aren’t. The points are ramped from 0 to 1 to create a smooth boundary. The point p texture is found by casting a ray from the texture cylinder to the center axis of the face mesh and using that value. The texture value found for point p will then depend on the weight and feather map value.
For view-dependent each input image is used as a texture map. Each is mapped to the mesh and assigned a blending weight for each vertex in the mesh. The rendering hardware will correct the perspective texture mapping along with linear interpolation of the blending weights.
The view dependent mapping will give you a more detail image than the view independent, though it consumes more rendering time. The view-independent loses some of the detail because of the re-sampling done to create the cylindrical texture map combining all of the input images. The examples below show the difference between view-dependent (right) and view-independent (left) texture mapping.
For things like teeth, eyes and ears which are hard to extract texture maps for the solution used here is to create separate texture maps for them. The teeth and eyes are usually partially covered so depending on the size of the opening for both the brightness value on the texture map is modified to make them look realistic.
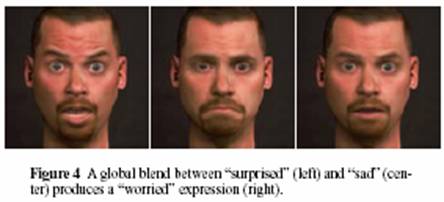
Once different faces have been rendered techniques are discussed to allow for the creation of new faces that are combinations of the old. The first is a global blend of two or more separate faces. This would take the expressions of the given images and find the average of the expression between them. This technique is shown below.
Then there is a Regional blend where the input faces are divided up into regions, usually of a stack of three or grid of six. The division of three would be the forehead (including the eyebrows), the eyes and the last part for the lower portion of the face. Specific portions of the input faces are selected to create the new images. This is shown by the example below.

The last techniques for combining pre-rendered faces uses a painterly interface which allows the user to use a brush and select any portion of a face to combined with others. The user could select half the mouth or one eye and create different faces.
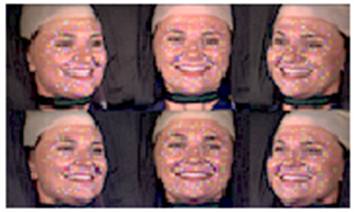
After I had cover this to a large extent I also briefly covered another technique which used fiducials to determine the geometry of a face and high resolution images to create the texture map. Like the example above multiple images are captured of the user. The user has fiducials attached all over their face. As shown below these fiducials are different colors. Each is separated from fiducials of like color to make the determination of the geometry easier. The fiducials from each image are used to determine the 3D geometry of each face. Each dot is labeled and compared throughout each image to determine 3D coordinates. Once the geometric model is created a texture map is created from the input images. The fiducials are removed from the images and when the texture map is used the spots where the fiducials were are interpolated over. This just generally touches on the topic covered in [2]. Below are the six images captured of the actress used in the testing with the fiducials glued to their head.
The other two papers given for my research were glanced at but not covered in my presentation. The first [3] discusses a technique using a cyberware (cylindrical scan of a head) scan to gather facial information. It then uses different techniques to modify parameters of the face to create new faces.
The last paper [4] discusses the biology of human skin and the physics of light at it strikes it.
[1] F. Pighin, J. Hecker, D. Lischinski, R. Szeliski, D. Salesin. Synthesizing Realistic Facial Expressions from Photographs. In SIGGRAPH 98 ConferenceProceedings ACM SIGGRAPH, 1998
[2] B. Guenter, C. Grimm, D. Wood, H. Malvar, F. Pighin. Making Faces. In SIGGRAPH 98 ConferenceProceedings. ACM SIGGRAPH, July 1998.
[3] V. Blanz, T. Vetter. A Morphable Model For the Synthesis Of 3D Faces. In SIGGRAPH 99 ConferenceProceedings. ACM SIGGRAPH, 1999.
[4] M. Gemert, S. Jacques, h. Sterenborg,
W. Star. Skin Optics. IEEE Transactions on
Biomedical Engineering. Vol. 36, No. 12, December 1989.