![]()


Homework 3: Due Tuesday, March 14, 2017, by class time (10/100 points)
Homework 3 Overview
In this project, we will explore hierarchical modeling of 3D meshes. We will also explore lighting and shading. The goal of this part of the assignment is to familiarize yourself with transformations and hierarchical modeling in OpenGL using a matrix stack. You will be modeling and animating a kinetic sculpture such as Alexander Calder's hanging mobiles. Example images are given below:

Here is a [ Video ] that shows such a kinetic sculpture in motion. Your task is to model and animate a kinetic sculpture. In order to do so, you need to first construct a scene containing several objects, then you need to organize them hierarchically and simulate their motions according to the hierarchy you define. Use several of the PLY models you rendered in project 2 in your hierarchy. All models should be properly sized so that they do not look disproportionate or display awkwardly. All models should have approximately the same size. In the video, you should have noticed multiple axes of movement for each model, where the PLY model may rotate about it's own axis while rotating around a larger arm off which it is hanging. Implement this effect!! To draw the arms connecting the meshes, you can just draw horizontal lines and to connect the meshes to the ends of the arm, just draw vertical lines. You can continue to draw the meshes as wireframes. Also, make sure you set up perspective projection
Per-Pixel Lighting (smooth shading) Draw all your meshes in your hierarchy as solid meshes (not wireframe). Implement shaders for per-pixel lighting and flat shading. You will switch between shading types using keystrokes below. Apply some interesting colors and material properties to your 3D meshes. Don't forget to enable depth testing (Hidden surface removal)
Implement a spotlight (described on pages 263 and 264 of your text) The spotlight is like a cone and light only reaches objects inside the cone. Objects outside a certain angle, called the cutoff angle, phi, gets no light (only ambient component). Make the cutoff angle a variable that can be controlled with a keystroke
Matrix stack You will need to implement a matrix stack, including PushMatrix( ) and PopMatrix( ) routines. You may use a simple linked list to store the stack or use a more sophisticated tree structure.
Animation Define a suitable frame rate such as 30 FPS and animate your model at that speed. Every 1/30 of a second, the animator will call the display callback function to re-draw everything. By displaying objects at slightly different locations (corresponding to camera or object movements) every frame, you can simulate an animation. Be mindful of performance issues while you implement this homework. As your scene size grows, avoid unnecessary re-initialization, buffer recopying, and file reopening that could slow down your program considerably.
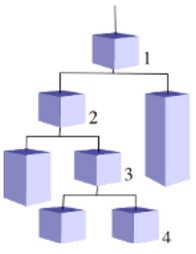
Requirements: Your sculpture must consist of at least 6 unique meshes with interesting colors. Each mesh should have a different color. Your sculpture must contain at least 3 levels of hierarchy. See the second image above. The animation should move all parts of the sculpture. It should be physically plausible and make sense. --- that is, there are no magical, free-flying shapes or disjointed movements. Objects should remain connected in whatever way you connected them as you animate them.
All mesh models should rotate counter-clockwise about their own Y axis. The arm of Level 1 of the hierarchy should rotate clockwise, the arm of level 2 of the hierarchy should rotate counter-clockwise, the arm of level 3 should rotate clockwise, and so on. Basically, the arms of consecutive levels of the hierarchy should alternate between rotating clockwise and counter-clockwise.
Additional Keystrokes
Also implement the following additional keystrokes.
- (User hits 'e'): Draw a box around each mesh showing the extents of each mesh. This keystroke should be a toggle button. If the extents box is not drawn, hitting e draws the extents box. If the extents box is already drawn, hitting e erases the extents box. Even though the mesh rotates about the Y axis, the extents box should not. It should be stationary around the mesh. If the mesh's width and length are different, you can just use the greater of the two dimensions as for your extents.
- (User hits 's'): The arms of the hierarchy follow a gentle sinusoid. i.e. in addition to going round clockwise or counterclockwise, the hierarchy arms (and objects) also go slightly up and down like on a merry go round. The sinusoidal movements of all levels of the hierarchy should have the same amplitude (i.e. move up and down gently by the same amount). The s key should be a toggle key. If the sinusoidal movement is currently off, hitting the s key initiates the sinusoidal movement. If the sinusoidal movement is currently on, hitting the s key turns it off so that objects just move in a simple circle. Note that whether the sinusoidal movement is on or off, consecutive levels of the hierarchy should alternate between rotating clockwise and counter-clockwise.
- (User hits 'p'): Increase spotlight cut off angle (increase cone angle) by a small amount
- (User hits 'P'): Decrease spotlight cut off angle (decrease cone angle) by a small amount
- (User hits 'm'): The scene is shaded using per-pixel lighting (smooth shading)
- (User hits 'M'): The scene is shaded using flat shading
Important Note: Once you decide how objects in your hierarchy should be connected, they should remain connected in that way. For instance, even when objects start to move in a sinusoidal pattern, they should still be connected to the arm and the arm should move up and down accordingly too. No magical or disjointed movements. The simulated movements should all be plausible.Submitting Your Work
Make sure to double-check that everything works before submitting. Submit all your executable and source files. Put all your work files (Visual Studio solution, OpenGL program, shaders, executable and input files into a folder and zip it. Essentially, after your project is complete, just zip the project directory created by Visual Studio. Submit your zip file using InstructAssist at [ https://ia.wpi.edu/cs543/] . Do not email me your program or submit it via dropbox. To make your submission smaller, delete the \ipch folder in the visual studio. On recompilation, Visual Studio will regenerate this folder without problems.
Create documentation for your program and submit it along with the project inside the zip file. Your documentation can be either a pure ASCII text or Microsoft Word file. The documentation does not have to be long. Briefly describe the structure of your program, what each file turned in contains. Explain briefly what each module does and tie in your filenames. Most importantly, give clear instructions on how to compile and run your program. MAKE SURE IT RUNS IN THE ZOOLAB before submission. Name your zip file according to the convention FirstName_lastName_hw3.zip
![[Feedback]](../../../../../Emmanuel_files/feedback.gif)
![[Search Our Web]](../../../../../Emmanuel_files/search.gif)
![[Return to the WPI Homepage]](../../../../../Emmanuel_files/seal.gif)
![[Return to CS Homepage]](../../../../../Emmanuel_files/new_cs.gif)