![]()


Homework 3: Due Tuesday, November 8, 2011, emailed by class time (10/100 points)
Homework 3 Overview
In this project, we're trying to add better lighting, shading and materials to your 3D meshes from in homework 2. We will implement flexible camera control and allow a user the ability to view our scenes from various angles. Finally, we shall explore hierarchical modeling.Important Note: The assignment will be released in two parts. Both parts are due on the due date. Also, all key strokes from homework 2 should still work. The keystrokes described below are just additional.
Homework 3 (Part A)
- (User hits the 'S' key) Draw your "current" mesh as solid mesh: Add lighting, colors, material properties and shading. Apply some interesting colors, lighting and shading to your 3D meshes. Make sure you have at least 3 light sources and use interesting colors to make your scene interesting. Also use interesting material properties to bring your scenes to life. Don't forget to enable depth testing (Hidden surface removal)
- Implement a spotlight (described on pages 263 and 264 of your text) The spotlight is like cone and light only reaches objects inside the cone. Objects outside a certain angle, called the cutoff angle, phi, gets no light (only ambient component). Make the cutoff angle a variable that can be controlled with a keyboard such that:
- (User hits 'p'): Increase cut off angle (increase cone angle)
- (User hits 'P'): Decrease cut off angle (decrease cone angle)
- Implement the Cook-Torrance lighting model (Per-pixel!!) The description in class describes the model per-vertex. Implement it per pixel. Hook up the model's parameters so that they can be changed using a keyboard. For instance
- (User hits 'm'): Increase roughness, m
- (User hits 'M'): Decrease roughness, m
Think of other parameters of Cook-Torrance that you would like to change using keystrokes. Hook them up with appropriate keys. Make sure to list the keys required to change each parameter in your documentation.
- Flexible Camera Control: In this part of the project, we want to allow the user to move the camera and view our mesh from various points. You may need to develop a camera class.The minimal controls/keystrokes are as follows:
"z": Slide camera 1 unit in the +ve z direction
"Z": Slide camera 1 unit in the -ve z direction
"y": Slide camera 1 unit in the +ve y direction
"Y": Slide camera 1 unit in the -ve y direction
"x": Slide camera 1 unit in the +ve x direction
"X": Slide camera 1 unit in the -ve x direction
"j": Change camera yaw by 2 degrees in the clockwise direction
"J": Change camera yaw by 2 degrees in the anticlockwise direction
"k": Change camera roll by 2 degrees in the clockwise direction
"K": Change camera roll by 2 degrees in the anticlockwise direction
"l": Change camera pitch by 2 degrees in the clockwise direction
"L": Change camera pitch by 2 degrees in the anticlockwise direction
Homework 3 (Part B)
The goal of this part of the assignment is to familiarize yourself with transformations and hierarchical modeling in OpenGL using a matrix stack. You will be modeling and animating a kinetic sculpture such as Alexander Calder's hanging mobiles. Example images are given below:

Here is a [ Video ] that shows such a kinetic sculpture in motion. Your task is to model and animate a kinetic sculpture. In order to do so, you need to first construct a scene containing several objects, then you need to organize them hierarchically and simulate their motions according to the hierarchy you define. Use several of the PLY models you rendered in project 2 in your hierarchy. All models should be properly sized so that they do not look disproportionate or display awkwardly. In the video, you should have noticed multiple axes of movement for each model, where the PLY model may rotate about it's own axis while rotating around a larger arm off which it is hanging. Implement this effect!!
Matrix stack You will need to implement a matrix stack, including PushMatrix( ) and PopMatrix( ) routines. You may use a simple linked list to store the stack or use a tree
Animation Define a suitable frame rate such as 30 FPS and animate your model at that speed. Every 1/30 of a second, the animator will call the display callback function to re-draw everything. By displaying objects at slightly different locations every frame, you can simulate an animation.
Spotlight Your final model should be under a spotlight so that the world can marvel at your amazing hierarchical structure.
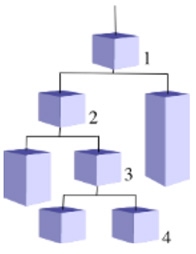
Requirements: Your sculpture must consists of at least 10 unique meshes with interesting colors and shading. Your sculpture must contain at least 4 levels of hierarchy. See the second image at the top of the page. The animation should move all parts of the sculpture. It should be physically motivated and make sense --- that is, there are no magical, free-flying shapes or disjointed movements.
Additional keystrokes to Implement
All keys that used to move a single mesh in assignment 2 should now move the entire hierarchy. For instance, keystroke X moves your entire hierarchy some units along the +ve X axis and redraws it. If the hierarchy is currently drawn as a wireframe, it should continue to be drawn as a wireframe after movements. If the hierarchy is drawn as a solid, it should be continue to be drawn as a solid after movements. Hitting R should rotate the entire hierarchy instead of rotating a single mesh as in project 2. You may disable the N and P keystrokes since they make no sense in this context.
- User hits 'S' (Draw all mesh models solid) at their current position. Note that hitting W still works (Draw all mesh models wireframe at their current position) from assignment 2.
Submitting Your Work
Make sure to double-check that everything works before submitting. Submit all your executable and source files. Put all your work files (Visual Studio solution, OpenGL program, shaders, executable and input files into a folder and zip it. Essentially, after your project is complete, just zip the project directory created by Visual Studio. If the filesize is less than 10MB, you can email me the file. If the final zip file is larger than 10MB, put it in a webspace and email me its URL.
Create documentation for your program and submit it along with the project inside the zip file. Your documentation can be either a pure ASCII text or Microsoft Word file. The documentation does not have to be long. Briefly describe the structure of your program, what each file turned in contains. Explain briefly what each module does and tie in your filenames. Most importantly, give clear instructions on how to compile and run your program. MAKE SURE IT RUNS before submission. Name your zip file according to the convention FirstName_lastName_hw3.zip Also specify which machine where you implemented your solution (e.g. home machine vs which WPI lab, laptop or desktop, graphics card and OpenGL version supported
![[Feedback]](../../../../../Emmanuel_files/feedback.gif)
![[Search Our Web]](../../../../../Emmanuel_files/search.gif)
![[Return to the WPI Homepage]](../../../../../Emmanuel_files/seal.gif)
![[Return to CS Homepage]](../../../../../Emmanuel_files/new_cs.gif)