![]()


Homework 2: Due Thursday, October 13, 2011, 11.59PM (10/100 points)
Homework 2 Overview
In this project, you will load a mesh stored as a .ply file, render it as a wireframe model using Vertex Buffer Objects and also add keyboard control that lets us move the .ply file around. A few optional preparation steps are suggested. You will not turn in the code which you generate in your preparatory steps.Preparation
- Read section 3.6 of your text: Get the code for the cube rendering program from the book's website under [ Chapter 3 Code ] . Compile the cube program and make sure it runs okay.
- Modify your program to read in .ply files and store them in a vertex-list data structure as described in Section 3.6.3 of the text. You can get 43 PLY files to work with [ Here ] . Further explanations about the format for PLY files are given below.
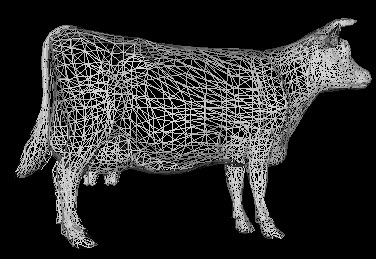
- Modify your program to render wireframe drawings of your .ply files from your vertex list using Vertex Buffer Objects (VBOs) and glDrawArrays as with the cube. Here's an example wireframe drawing of the cow.ply file:
- Set up a Current Transform Matrix (CTM) as described in section 3.11 of the text. You may find the files mat.h and vec.h useful.
- Implement keyboard controls that enable you to perform the keyboard controls described below in the section "Behavior of your submitted program".
Behavior of your submitted program
- User hits 'W' (Draw your wireframe) at a suitable initial position from the viewer.
- User hits 'N' (Draw next wireframe) Organize the PLY files in a list going from 1-43. Hitting N should load and draw the next wireframe model to the current one in your list of PLY files. You can hardcode filenames if you want. The PLY files may not all be of the same size. So to properly set up the viewing position using LookAt, you may have to calculate the bounding box of the mesh and then set your view distance to a suitable multiple of the bounding box
- User hits 'P' (Draw previous wireframe) Organize the PLY files in a list going from 1-43. Hitting P should load and draw the previous wireframe model to the current one in your list of PLY files.
- User hits 'X' (Translate your wireframe in the +ve X direction) Move your wireframe some units along the +ve X axis and redraw it. Camera position remains fixed for this translation and all other translations below. The extent to which your translation is apparent depends on how far you positioned your wireframe from the viewer. So, it's left to you as a design choice to pick an appropriate distance to translate the wireframe each time the user hits 'X'.
- User hits 'x' (Translate your wireframe in the -ve X direction) Move your wireframe some units along the -ve X axis. The number of units to translate your wireframe each time the user hits 'x' is left to you as a design choice.
- User hits 'Y' (Translate your wireframe in the +ve Y direction) Move your wireframe some units along the +ve Y axis. The number of units to translate your wireframe each time the user hits 'Y' is left to you as a design choice.
- User hits 'y' (Translate your wireframe in the -ve y direction) Move your wireframe some units along the -ve Y axis. The number of units to translate your wireframe each time the user hits 'y' is left to you as a design choice.
- User hits 'Z' (Translate your wireframe in the +ve Z direction) Move your wireframe some units along the +ve Z axis. The number of units to translate your wireframe each time the user hits 'Z' is left to you as a design choice.
- User hits 'z' (Translate your wireframe in the -ve Z direction) Move your wireframe some units along the -ve Z axis. The number of units to translate your wireframe each time the user hits 'z' is left to you as a design choice.
- User hits 'R' (Rotate your wireframe about it's CURRENT position) Just like in a showroom where the wireframe is on a swivel, rotate your wireframe at either smoothly at a moderate speed about its current position (not about the center of the scene) or you can rotate the wireframe by a small angle (e.g. 2 degrees) every time the user hits R. Hint: Use double buffering (glutSwapBuffers( )) to make the rotation smooth if you choose to animate the rotation.
|
File Text |
What you should do |
|
Ply |
If not
present, exit |
|
Format
ascii 1.0 |
Skip line |
|
element
vertex 758 |
Read # of
vertices (758) |
|
property
float32 x property
float32 y property float32
z |
Skip
these lines |
|
element
face 1140 |
Read # of
polygons (1140) |
|
property
list uint8 int32 vertex_indices |
Skip line |
|
end_header |
End of
header section ? skip line |
|
6.5 -7.2
1.1 0.5 0.8
-1.5 1.2 9.0
5.5 etc. |
Coords of
Vertex #0 Coords of
Vertex #1 Coords of
Vertex #2 And so
on, until Vertex #757 |
|
3 1 9 8 3 5 10 5 3 7 0 9 etc. |
First
no.=#vertices in polygon. In our case,
it?s always 3. Then the next three
numbers tell you which vertices make up that polygon. So, triangle #1 is made from vertices #1,
#9, and #8. |
![[Return to the WPI Homepage]](../../../../../Emmanuel_files/seal.gif)
![[Return to CS Homepage]](../../../../../Emmanuel_files/new_cs.gif)