![]()


The aim of this project is to get you familiar with Android apps
that use the Android Camera and Images. You should complete
this project in your GROUPS. The project
covers a lot of ground because it is done by a GROUP of students.
The GROUP will
submit one project with all team members listed.
You may discuss the projects with other classmates or on
InstructAssist but each group will
submit their own code for the project.
Step 1: Learn how to run your apps on a real phone Thus far you have run all your programs on the Android Studio Emulator. The emulator has limitations when running programs that require the phone's camera. So you will need to run this project on a real phone. A good video to learn how to connect and use a real smartphone with Android Studio is located [ HERE ]
In order to run code on a real phone, you need to have USB drivers for your phone's model installed on the debugging PC . To learn how to install USB drivers on your home machine and how to run the examples in the textbook(s), go through the following tutorials. Note that on Nexus phones, you just need to install USB drivers (First link below). Other smartphone models may have to get their phones drivers from their manufacturer's website.
Step 2: Understand fragments, camera and databases:
This project will explore fragments, taking pictures
with the smartphone camera and saving them on the smartphone's storage,
as well as storing information in a database. You will need to make sure you
understand these concepts before starting coding. First review lecture
slides 3 and 4. You should also read through the following Google tutorials
to ensure you understand these concepts:
Step 3: Download code for Chapter 16 (CriminalIntent) Download,
and unzip the code for Chapter 16 of Android Nerd Ranch (2nd Edition)
[ Here ] .
Step 4: Study the code for Chapter 16 of Android Nerd Ranch
You will be required to extend and modify the code for chapter 16 for this
project. Read chapters 7,14 and 16 of Android Nerd Ranch (3rd edition) and also
study the code for Chapter 16. Run the
code for chapter 16 on your phone and make sure you understand the code.
NOTE: This CriminalIntent project uses an older gradle version. You should upgrade your gradle version in order to run it.
The following documents provides some steps follow [ How to upgrade your gradle version and run the CriminalIntent code ]
Step 5: Get Face Detection and OCR working: The following demo
of the Mobile Vistion API
from Google includes [ Face Detection and OCR ] as described in class.
You can also access the code on Google's
[ Mobile Vision Github site ] .
You will be required to integrate face detection and OCR into this
project. Download the code, run the examples on a real phone and study them.
Make sure you understand the code.
You can also visit
[ Google's Mobile Vision Page to ]
understand more about this API and demo code.
NOTE: If you have errors/difficulties running this project,
the following step by step instructions show you [ How to run Face Detection and OCR Project ]
Step 6: Make the following Changes to the code:
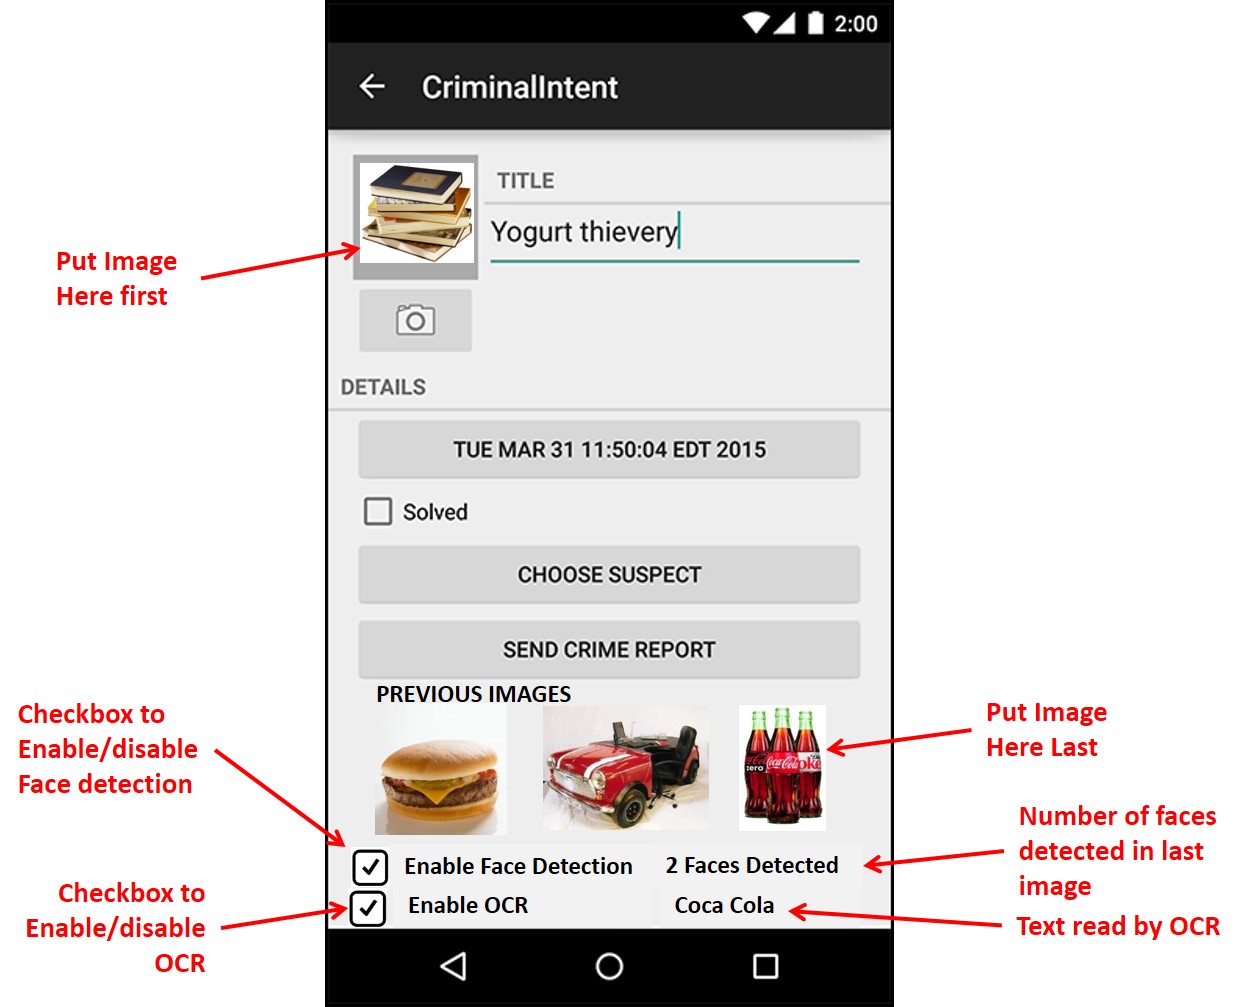
Step 7: Add face detection:
Add face detection for your project. Add a checkbox in the bottom left
corner. When checked, face detection is enabled and when unchecked, face
detection is off. When Face detection is enabled, the rectangles
for face detection are overlayed around each face in the preview of the picture.
When the picture is taken, the number of faces found in the LAST
PICTURE taken is reported in the bottom right corner of the screen
as shown. So, for example, if the user tries to take a picture with
2 faces, two rectangles would appear around those faces during the
preview, before the picture is taken. After the picture is taken, if
face detection is
enabled, the text displaying how many faces were detected (e.g. "2 Faces detected")
will be displayed in the bottom
right corner of the screen. If face detection is not enabled, then
the bottom right corner of the screen should be blank (nothing displayed).
Step 8: Add OCR:
Add OCR to your project. Add a checkbox in the bottom left
corner. When checked, OCR is enabled and when unchecked, OCR is off.
When OCR is is enabled, the text read in the preview of the picture are
overlayed. When the picture is taken, the text (or one of the text if there are multiple text)
in the LAST PICTURE taken is printed out ounto the bottom right corner of the screen
as shown. If OCR is not enabled, then
the bottom right corner of the screen should be blank (nothing displayed).
Step 9: Record session of running code on real phone
You will submit both your Android Studio code including the APK (compliled Android program) and a video
of you running the app on your phone. You will need to learn how to
record a session of you running the app on your phone. Here's a
good video on how to do Android screen capture
[ Here ]
![[Return to the WPI Homepage]](../../../../../Emmanuel_files/seal.gif)
![[Return to CS Homepage]](../../../../../Emmanuel_files/new_cs.gif)