![]()


Homework 4 Overview
In this project you will add more realism to your hierarchy from homework 3, by adding lighting, shading, texturing and shadows
Note that all interaction keys that worked for homework 3 should also work in your final submission for homework 4. Some additional keys are required below for homework 4. The keys specified for homework 2 do NOT have to work. Just disable them. The hierarchy should rotate continuously as specified in homework 3.
Homework 4 Preparation
- Understand how to load textures using the libbmpread library: In this project you shall load textures in the bmp file format and use them to texture parts of your scene. The following [ Visual Studio solution ] contains a working program that reads in and displays a bmp file usain_bolt.bmp using the libbmpread library. To start off, download the Visual Studio Solution, compile it and run it. I have tested it and it works in the Zoolab.
To read in the usain_bolt.bmp file, the program uses the [ libbmpread library ] which is a tiny, fast bitmap (.bmp) image file loader. Specifically, libbmpread is implemented as two files bmpread.c and bmpread.h which have been included in the Visual Studio starter code. bmp file loading functions and data structures are then used in the starter program to load the bmp file. Study this example focusing on how the bmp files are being read in. You can also get more documentation on the libbmpread library website [ Here ] .
- Since you will be rendering additional effects that will slow down your program, reduce the number of levels of your hierarchy to 2 arms (along with any mesh models connected to these 2 arms) to increase rendering speed: Render your PLY meshes on your hierarchy as solid models. Apply per-vertex (Gouraud) smooth shading. Add a floor plane beneath your hierarchy so that it stands on the floor plane. If you did not get the hierarchy working in homework 3, just create a test scene with 3 PLY files of your choice (including a car PLY file) and place them on a ground plane. If you are unable to create a test scene with 3 PLY files on a ground plane, you will receive a score of 0 for this homework.
Homework 4 Specifics
The specific features you shall implement in this homework are:
- Texture the floor plane with grass or stone: Texture map some grass onto the floor of your scene to make it look like grass is growing. Use the following grass texture [ grass.bmp ] or make it look like the floor is paved with stone by texturing using a stone texture [ stones.bmp] Use the libbmpread library above to read in your bmp texture files. Do not try to stretch these small textures over a large floor. Map each texture to the bottom left corner of the floor undistorted and then use the appropriate parameters to repeat the texture to cover the entire floor. The example program in Appendix A.8 on page 638 of your text gives the complete working code of a program that does texturing.
- Shadows: Section 4.10 of your textbook describes a simple technique to render shadows using projection. Implement this shadow algorithm such that the shadows of the moving hierarchy are projected onto the floor plane. The shadow of the entire scene should be updated as the hierarchy or camera moves.
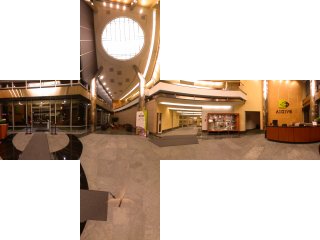
- Environment Mapping: Add in reflective and refractive environment mapping using cubemaps to your scene. The example in section 7.9 (page 393) of your text presents a complete working example of a reflection map. The class slides present how to implement refraction. Use the following cube map with its [ cube map sides in 6 images ] as your environment map. For reference purposes, the complete environment map looks like this:

Summary of Your program behavior
Control your scene using the following keystrokes.Notes: No OpenGL fixed function commands (glBegin, glVertex, etc) or immediate mode drawing commands should be used in your program. All drawing should be done using shaders, retained mode, Vertex Buffer Objects, and glDrawArrays similar to the code in your textbook (and in your previous projects)
- Key A: Toggle shadows ON/OFF. When ON, the shadows show up and when OFF the shadows do not show up.
- Key B Toggle ON/OFF between a grass texture and stone texture. When ON, the floor is textured with grass and when OFF the floor is textured using the stone texture.
- Key C: Toggle reflection ON/OFF. When ON, all PLY objects are drawn with reflection. When OFF, the PLY objects are drawn with no reflection (the models should show just be solid models with per-vertex lighting). Select an appropriate shininess (reflectivity) for the models.
- Key D: Toggle refraction ON/OFF. When ON, all PLY objects are drawn with refraction. When OFF, the PLY objects are drawn with no refraction (the models should show just be solid models with per-vertex lighting). Select an appropriate refractive index for the models.
Submitting Your Work
Make sure to double-check that everything works before submitting. Submit all your executable and source files. Put all your work files (Visual Studio solution, OpenGL program, shaders, executable and input files into a folder and zip it. Essentially, after your project is complete, just zip the project directory created by Visual Studio. Submit your project using web-based turnin.
Create documentation for your program and submit it along with the project inside the zip file. Your documentation can be either a pure ASCII text or Microsoft Word file. The documentation does not have to be long. Briefly describe the structure of your program, what each file turned in contains. Explain briefly what each module does and tie in your filenames. Most importantly, give clear instructions on how to compile and run your program. MAKE SURE IT RUNS before submission. Name your zip file according to the convention FirstName_lastName_hw4.zip