![]()


Homework 4: Due Thursday Feb 24, 11.59PM
In this project, you will learn how to create OpenGL shaders by implementing simple shaders written in the GL Shading Language (GLSL).
Homework 4 Requirements:
Create shaders that implement i) a reflection model and ii) a more sophisticated light model. Then run your shaders on a programmable graphics card (GPU). The shaders will exhibit a specular reflection model called the Banks Anisotropic Reflection and the Warn Lighting Model on a per-pixel basis (both explained below). You will write/modify two shader files and run them in a provided GLSL Demo application. To make things easier, the GLSL Demo application provides numerous examples of other GLSL shaders. You can study the provided example shaders to help you understand how to write your own shaders for the assignment. The assignment consists of the following steps:
The rest of the document outlines the details necessary for you to implement the shaders, some technical details and shortcuts about the application, and where to get the files. Please read the rest of this document before trying to write the shaders as it will make your life much easier.
- Test the capabilities of your machine. Make sure that the GLSL Demo runs on your computer (look at the provided examples as well. More details below).
- Create shader effects to run on the application. You should create 1 vertex shader, 1 fragment shader, and modify the configuration XML to understand how to read your shaders and apply them to the demo scenes.
- Write the shaders required for the assignments for your assignment.
- Take screenshots, document and turn in you work
Background
Anisotropic Specular HighlightsAnisotropic Reflections are just like regular reflections, except stretched or blurred based on the orientation of small grooves (bumps, fibers or scratches) that exist on a reflective surface. Anisotropic specular highlights can be seen on objects with very small grooves, for example in brushed metal, old LP records, silk and even hair (as a whole, not per strand). Below are two rendered examples of brushed or grooved metal that exhibit anisotropic reflection.


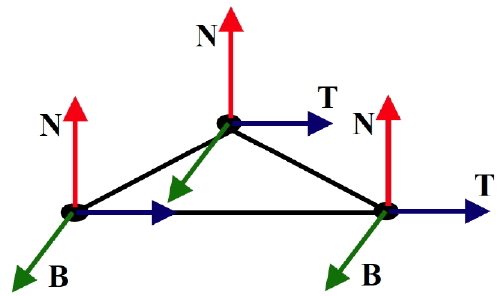
In the graphics literature, there are several formulas for modeling anisotropic reflection. One in particular is called the Banks model. Modeling these types of specular reflections can be complicated. In the above examples, a different coordinate frame, called Tangent Space, is used to render these reflection functions. Tangent space consists of three unit vectors oriented according to the object surface; the first you are already familiar with is the normal N. The other two are called the Tangent T (along the material's grain) and Bi-normal B (sometimes called Bi-tangent or across the material's grain). The three vectors are orthogonal and form a coordinate system on the surface of the object (per vertex). Below is a diagram showing different tangent space vectors for each vertex of a triangle.
The formula you should implement for this assignment is a simplified version of the Banks formula. The modified formula is similar to the Phong reflection model, in that there is an ambient, diffuse, and specular component. The diffuse and specular components themselves differ significantly from Phong while the ambient constant remains the same. The major difference is the use of the tangent vector T within the formulas. This indicates that the Banks reflection function has a relationship to how the surface is changing, similar to that of the normal N. Once the tangent space vectors are determined (OpenGL gives you N and gives you hints on how to get T & B), but before you can use them, they need to be in the same space as the light vector L and the view vector V. You can do this by transforming them to the appropriate space or coordinate system just as you would the normal N. Fortunately, the environment you'll be working in (explained below) provides the Tangent space vectors for us, which are not easy to calculate.
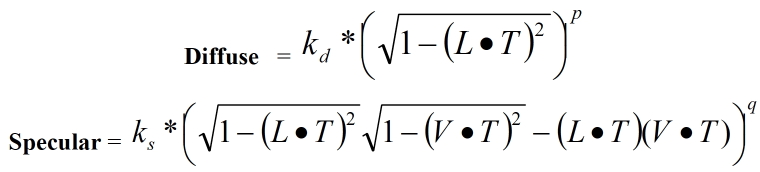
The kd and ks are the same material values specified in the Phong Illumination model. Just as in the Phong model, there is an exponent on the specular component q. The difference here is that there is also an exponent on the diffuse term p as well. The exponent p helps to keep the shading from getting too bright (like a canceling effect). Generally p will range from [2.0 - 5.0]. The exponent q provides a way to change the size of the specular highlight and has the same range of values as the Phong model.
Warn Lighting Model
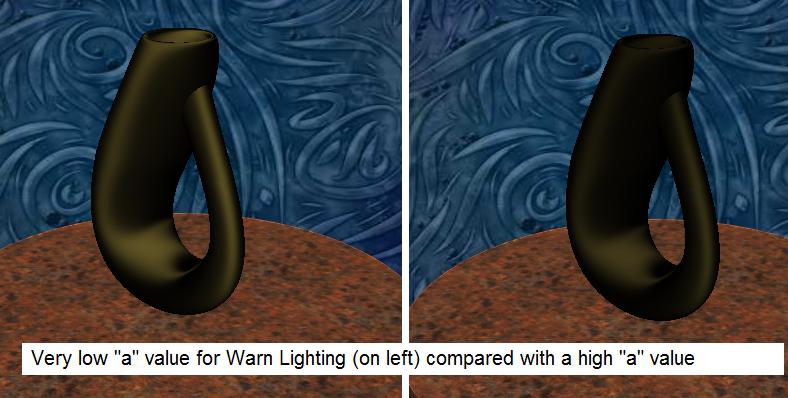
The Warn Lighting Model is a spotlight lighting model. Essentially, intensity of light radiated from the source forms a lobe. The surfaces in the direction corresponding to the center of the lobe receives the highest light intensity and the intensities received in all other directions falls off for directions away from the center of the lobe. The figure below is a diagram of the Warn model. The variable a in the exponent of the equation below controls the shape of the lobe (how quickly the lobe falls off. i.e whether the lobe is a narrow sharp lobe or a more gentle falloff). Larger values of a make the Warn lobe more narrow.
You should also account for attenuation. The light intensity received at the vertex should be inversely proportional to the distance of the vertex from the light source. Accounting for all these factors, the final equation for the Warn lighting model is as follows. 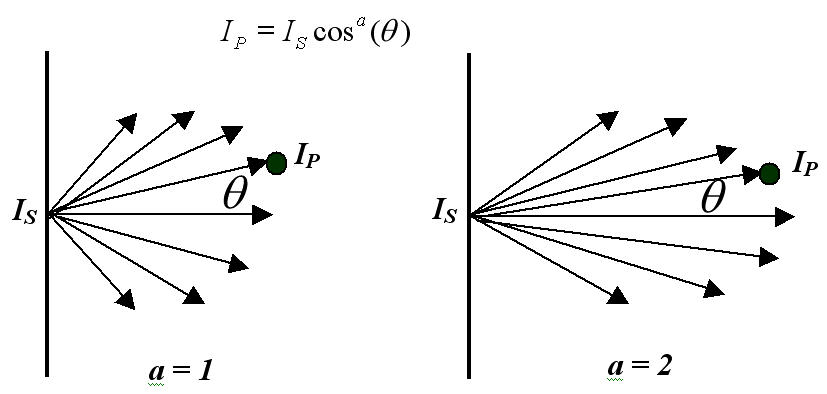
The description above is for the Warn model per-vertex. You can start out implementing the shaders on a per-vertex basis. Once it's all working, convert to per-pixel lighting. See class slides or other tutorials for how to implement the Warn model as per-pixel lighting. 
Writing your shaders
The very first thing you need to do is determine if your video card can support GPU programming. Specifically, you are looking for support for the following two hardware extensions ARB_vertex_shader & ARB_fragment_shader. To determine your card's capabilities for you, try the Glinfo application located here: (GLinfo2.exe). This application will give a list of extensions your card supports. Run the GLinfo2 application, click on "Extension lists" on the left sidebar and check to see if the ARB_vertex_shader & ARB_fragment_shader are listed (supported by your card).The shaders you are going to be writing are just small text files resembling C/C++ code in the form of a function (called main). The files, once written, can be loaded into the pre-compiled application that will render them on the GPU. The application, called GLSLDemo, is capable of handling all the setup details you would normally have to do when writing your own C/C++ application for GPU rendering. All that you are required to do is write 1 Vertex and 1 Fragment shader for the previously mentioned effects (Combine Banks Anisotropic Specular + Warn lighting into 2 shader files + Modified 1 XML file to read your shaders).
The rendering application that will be used to run your shaders is located here GLSLDemo.zip. Unzip the application to a computer with a programmable GPU. The executable file is located in the "bin" directory of the demo application. Also, there are example shader files for you to look at within the demo application located in the "shaders" directory. There are two sub-directories under the main shaders directory (default & OrangeBook). Both directories contain examples from the GLSL Orange book. There are two configuration XML files located in the "shaders" directory. This file tells the application which shaders to load into the application and how to configure the parameters for the shaders (uniform, varying, and texture variables). You need to create an entry in one of these files for your shaders called banks_warn. The name of the entries in the configuration file has to match the filename of your shaders. Call your shaders banks_warn.vert, and banks_warn.frag.
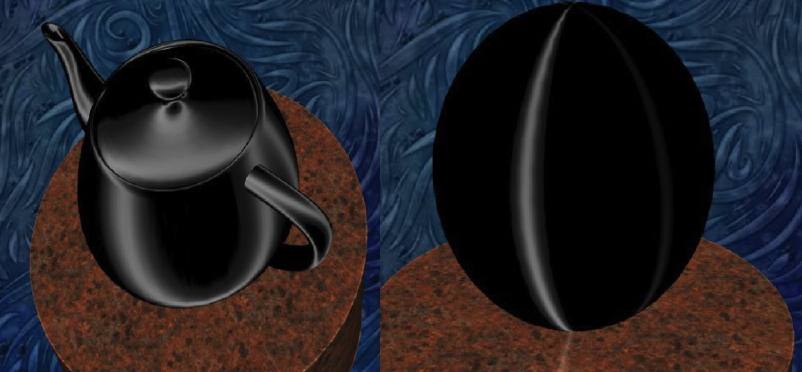
Your shader should deal with vectors in World and Tangent space, which can be tricky to deal with. To aid in dealing with the Tangent space, an example shader provided with the application uses the tangent space as well. So you may use this other examples as a guide for writing the shaders for your assignment. When you have finished, your objects should display specular reflections similar to the images below.
The Banks reflection model depends on two variables, the light vector & view vector. These vectors need to be transformed into Tangent space. The application will provide the Tangent, Bi-Tangent (Bi-normal), and Normal vectors for you per vertex as long as the configuration files are setup properly (again look at the provided examples for how to do this). Hint: The bump map example shows how to use the normal, tangent and bi-tangent vectors
The following GLSL tutorials are excellent and you may find them useful http://www.opengl.org/sdk/docs/tutorials/TyphoonLabs/
Debugging
Important note: Even though you're required to implement the banks reflectance as well as the Warn lights, I suggest that you don't try to implement both at the same time. Use a simple point light source to implement the banks model before you try to implement the Warn model. Initially, set the a parameter in the Warn light to give you a fat wide lobe which has very little of the spotlight effect. After the Warn model starts working, then try more narrow lobes. Be systematic or else you'll have a hard time debugging your shaders.The application has two facilities for debugging your shader. The first is the "Information Log" located under the pull-down menu "View". The log will give you feedback regarding your shaders after you click on them (which causes the application to compile and run your shaders). The most important feedback the log will provide are the errors your shaders are producing (including line numbers, error code, and a guess at the problem). The second form of feedback the application will give you is that the model you are trying to render with your shader, if there are errors in you shaders, will be covered in a striped line pattern, and/or your shader will be highlighted in red on the side menu.
Campus Labs for Running GLSL Demo
GLSLDemo is a Win32-only application. Although the source code is provided on the authors Website, we cannot guarantee it will work on other platforms. You may do this assignment on any Windows machine that supports GLSL (including your home machine). If you do not have a Windows computer that will run the application, most CCC Windows machines should work. Specifically, GLSLDemo has been tested and works on the machines in Higgins Labs building, RM 230. Unfortunately, the machines in the TA office hours rooms in Fuller labs CANNOT run the GLSLDemo application.New Location for Office Hours
Since the Fuller office hours machines do not run GLSLDemo, all office hours are moved to Higgins lab room 230 for the week starting on Friday, Feb 18 to Thursday, Feb 24. The TAs will be in Higgins Lab 230 at their usual times (see office hour schedule). From Friday Feb 25 till the end of the term, TA office hours will be moved back to the Fuller TA office hours room.Documentation
Please comment your shaders as best you can, provide a README of any information we might need to understand your work and capture at least two screen shots.Submitting your project
You will need to submit:Your files should be free of compiling errors and bugs. Please do not zip and send the entire GLSLDemo program since it can be quite large. Receiving the compiled program from almost 50 students can clog up the TAs email inboxes. Please be sure to test the file prior to emailing them.
- your two shader files,
- modified XML file to read your shader files into GLSLDemo,
- at least two screen shots (large enough to see the reflections please),
- and your README.
You can use WinZip to zip up all your files or use the following command to ZIP everything. Assuming your code is in a directory "proj4":
zip -r FirstName_LastName_proj4.zip proj4
To submit your work, email your ZIP file to cs4731-staff@cs.wpi.edu by the due date. Since the GLSLDemo runs in Windows, we shall not use turnin for submitting this assignment.
Academic Honesty
Remember the policy on Academic Honesty: You may discuss the assignment with others, but you are to do your own work.
![[Feedback]](../../../../../Emmanuel_files/feedback.gif)
![[Search Our Web]](../../../../../Emmanuel_files/search.gif)
![[Return to the WPI Homepage]](../../../../../Emmanuel_files/seal.gif)
![[Return to CS Homepage]](../../../../../Emmanuel_files/new_cs.gif)