![]()


Homework 1: PoliBook, an interactive polyline viewer and editor
Homework 1 Overview
The aim of this project is to get you comfortable with working in 2D using OpenGL calls. You will also be applying window-to-viewport mapping, tiling polylines, and exploring keyboard and mouse interaction routines. You will create a program Polibook which views polyline files in interesting ways and also allows you to interactively draw your own polylines onto the screen. Here goes:
Step 1: Read more polyline files in GRS format:
The polyline file you drew in homework 0 is in the GRS format, a homegrown format. Here are a few more GRS polyline files to work with:
birdhead.dat
dragon.dat
house.dat
knight.dat
rex.dat
scene.dat
usa.dat
vinci.dat
The structure of GRS files is:
- a number of comment lines, followed by a line starting with at least one asterisk: '*'.
- The "extent" of the figure: (left, top, right, bottom).
- The number of polylines in the figure.
- The list of polylines: each starts with the number of points in the polyline, followed by the (x, y) pairs for each point.
First, modify your practice code that previously read in dino.dat so that you can replace the dino.dat filename with any of the above .dat files. The plan is that when you re-compile it, the new polyline file is drawn on the screen, just like dino.dat. There are a few things you should note for your implementation.
- Be careful with how you pass parameters to the glViewport( ), glOrtho2D( ) calls (Practice exercise 3.2.1 on page 98 of Hill may prove useful). Make sure you understand how they work.
- The "extent" line of the GRS file will be used to set the world window i.e. passed to glOrtho2D( )
- If you look at the vertex coordinates of some of the GRS files, they are specified in floating point numbers, so you'll have to switch to float or double number formats. For instance, the x and y coordinates of vertices are currently (for dino.dat in hw0) being read in as integers and their values will be truncated if you don't change them to floating point numbers. Also, remember that glVertex2i( ) uses integers, so you'll need a different call to work with floats. Also, in general, using a glVertex3f( ) with the z value set to zero (see examples) can be used in place of glVertex2f( ) commands. i.e. glVertex3f(x,y,0) usually works same as glVertex2f(x,y).
- Note that a lot of the GRS files start with comments. You can either manually cut those out or read them in and dump them in your program.
- The format for dino.dat is a little different in that it doesn't have the window dimensions (or comments) right at the top. Therefore, off the bat, a program which reads other GRS files without problems will have new problems with your old dino.dat file. You can either throw in a dummy extents window at the top of dino.dat or come up with a solution that works. Hint:a world window of (0,640,0,480) should work!!
Summary of Your program behavior
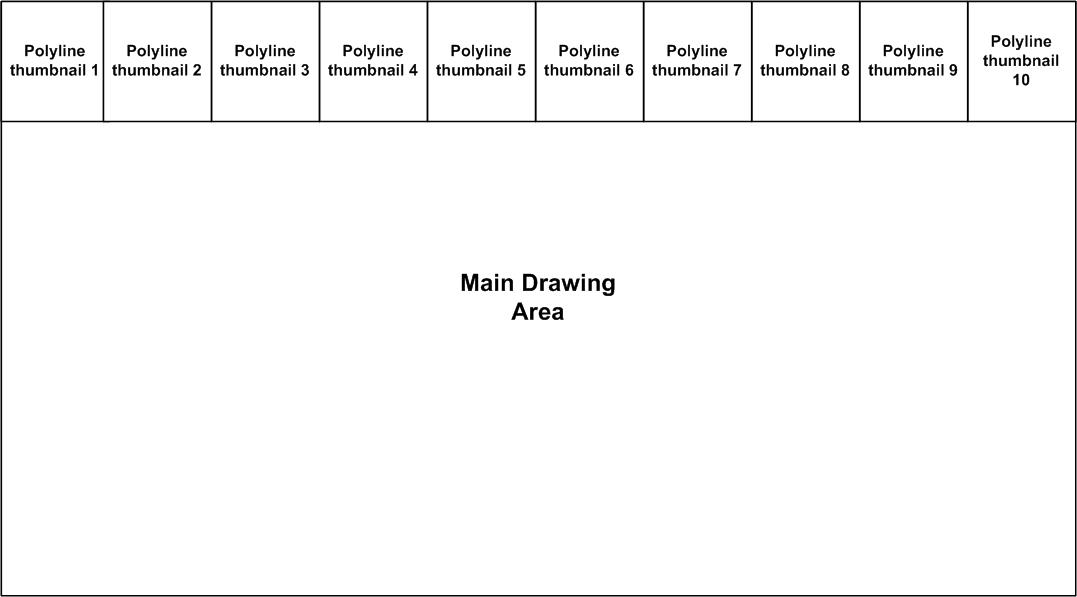
The figure above shows the layout of a polyline viewer you should produce. At the top of your viewport, 10 thumbnails (8 new thumbnails + 2 occurrences of usa.dat) of the polyline files should be lined up. These 10 thumbnails should ALWAYS be visible at the top edge of the viewport whenever your program is running. The larger drawing area below the thumbnails is the main drawing area in which all drawing will be done. On start up, choose one of the polyline files to draw in the main drawing area as a default. The thumbnails AND main drawing automatically resize if the viewport is expanded or resized.
Clicking on any thumbnails lined up at the top should make the corresponding polyline file the current drawing and draw a larger version of the polyline file to fill the main drawing area while maintaining aspect ratio. This is also known as the 'p state'. More details on the program behavior is given below. Your program should also have the following behavior and user (keyboard and mouse) interaction capabilities when you run it:
Event: A key is pressed:
- 'p' key: (state p) Response: the program draws all polyline files provided at the top of the viewport in 10 equal-sized thumbnails (8 new ones above + usa.dat 2 times) and randomly picks one to draw in large dimensions in the "main drawing window" . In the state p, if a user clicks on any of the thumbnails at the top, the corresponding polyline file in that thumbnail becomes the current drawing. The "main drawing space" is erased and the polyline in that thumbnail is redrawn to fill the entire "main drawing space".
- 't' key: (state t) Response: An 8x8 tiling of all polyline files is drawn in the "main drawing space" (polyline thumbnails still at top edge). Repeatedly hitting the 't' key should create a different 8x8 tiling where the polyline picked for any tile is "random".(polyline thumbnails still at the top edge)
- 'v' key (state v) Response: Draw a checkerboard pattern, which is a tiling of the current polyline file similar to that drawn in state "t", but the only difference is that every alternate tile is flipped upside down. For example if the polyline in tile (2,4) is upright, then tile (2,5) is upside down and tile (2,6) is upright, etc. State v is only accessible from state p. (polyline thumbnails still at the top edge)
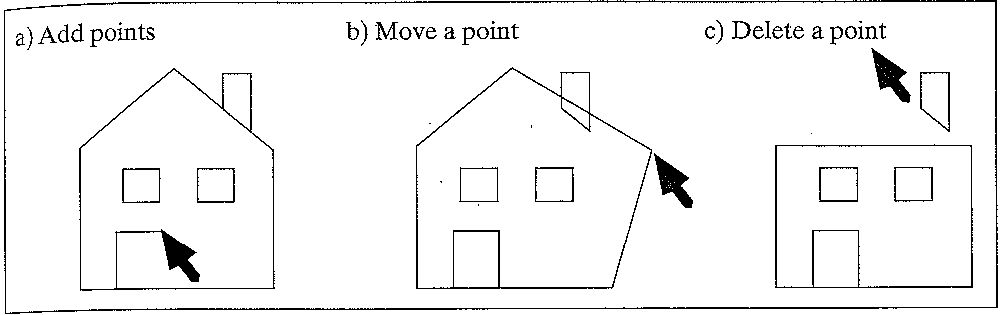
- 'e' key (state e) Response: PoliBook clears the screen and goes into drawing mode (polyline thumbnails still at the top edge). On the first click in the drawing area, a dot is drawn at wherever the user clicked. On subsequent clicks, a line is drawn from the last accepted mouse click position to the current mouse click position. Your program should be set up to accept up to 100 possible mouse clicks in one polyline. You can accept and store user-provided points in an array. If the 'b" key is held down while clicking, the current click point is NOT joined to the previous click point and instead a fresh polyline is started and drawn in addition to whatever previous polyline had been drawn. For instance, holding the "b" key down may be useful for beginning to draw the window of a house after drawing other parts. Part a) of the figure below shows how the drawing or addition of points works. The example shows a house in the process of being drawn; the user has just clicked at the position shown, and a line has been drawn from the previous point to the one designated by the mouse.
- 'm' key (state m) Response: Move a previously drawn point on the current polyline. Part b) of the figure below shows this move in action. The user positions the cursor near the vertex of some polyline, presses down the mouse button, and "drags" the chosen point to some other location before releasing the button. Upon release of the button, the previous lines connected to this point are erased, and new lines are drawn to it.
- 'd' key (state d) Response: Delete a point from a polyline. Part c) of the figure below shows how a point is deleted from a polyline. The user clicks near the vertex of some polyline, and the two line segments connected to that vertex are erased. Then the two other endpoints of the segments just erased are connected with a line segment.
- 'c' key (state c) Response: Clear the screen and restart drawing.
- esc: Response: The program terminates.
Note: States (p, t and v) are polyline viewing states in which you can play with polyline files stored in a .dat file. States (e,m,d and c) are polyline drawing states. State e is the initial drawing state and states (m,d and c) are only accessible from state e. In the drawing states, you should be able to accept and draw new polylines onto the screen, but your program does NOT have to be able to edit the provided ones (e.g. dino.dat, usa.dat, etc). You also don't have to be able to save or write out the polyline file drawn on the screen to a file. You may choose to do that but no extra credit will be given. Make sure that reshape works for all states (p, t, v, e, m, d and c). i.e. if the user grabs the lower right corner of the window and increases or reduces the screen window size, whatever was drawn in it before (and thumbnails) is redrawn to the largest possible size, without distortion (i.e. always maintain correct aspect ratio for each polyline file).
Submission: Submit all your executable and source files using turnin. Create documentation for your program and submit it along with the project. Your documentation should be pure ASCII text that's readable on the CCC Unix machines (no microsoft Word, RTF or MAC files, etc). The documentation does not have to be long. Briefly describe the structure of your program, what each file turned in contains. Explain briefly what each module does and tie in your filenames. Most importantly, tell the TAs how to compile and run your program. Put everything in one directory on ccc.wpi.edu, compile it and MAKE SURE IT RUNSbefore submission. Then tar everything up into a single archive file. You shall submit a single tar file via turnin. The command to tar everything up is:
tar cvf FirstName_LastName_hw1.tar *
General Hints
Here are a more few hints you might find useful:
- You need to modify your keyboard( ) function in order to react to keyboard input from the user and your mouse( ) function to react to mouse input.
- The following sections of Hill may be useful in doing your work:
- Section 2.4 of Hill (pp. 71 - 76, 5 pages) explains simple mouse and keyboard interaction using openGL.
- Practice exercise 3.2.1 (pp. 98-100, 2 pages) is about using gluOrtho2D( ) and glViewport( ) to do window-to-viewport mapping using OpenGL.
- Example 3.2.4 of Hill, (pp. 100-101, 1 page) tells you how to do tiling
- Read example 2.4.2, figure 2.40 (pp 73, 0.5 page), to understand how to collect mouse points two different sets of mouse points. Since this routine is actually for drawing the selected screen rectangle, you will probably need to modify this
- For the reshape part, after a user changes your screen window (viewport) dimensions by dragging the lower right corner, simply call glViewport again using the new width and height, and then redraw using glutPostRedisplay( ). Note: Don't blindly call glOrtho2D and glViewport without thinking about how they work.
![[Feedback]](../../../../../Emmanuel_files/feedback.gif)
![[Search Our Web]](../../../../../Emmanuel_files/search.gif)
![[Return to the WPI Homepage]](../../../../../Emmanuel_files/seal.gif)
![[Return to CS Homepage]](../../../../../Emmanuel_files/new_cs.gif)