
Lab
6 — Using Microsoft Visual Studio
Wednesday, April 22, 2009
Objective
· To learn to use an Integrated Development Environment (IDE), specifically Visual Studio.
Introduction
This week, you will learn how to create a project in Visual Studio from an existing application, and then how to build it and debug it.
Getting Started
1. Sign the attendance sheet.
cp /cs/cs2301-d09/labs/lab4/* .
Your directory should now contain the files intarray.c, intarray.h, sinewave.c, and makefile. Throw away the makefile! Visual Studio will create something else instead.
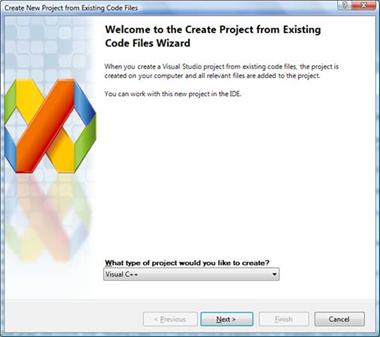
Select ‘Visual C++’ from the pull-down menu asking what type of project to create, and then click ‘Next.’ (In Visual Studio, the C language is a subset of C++).
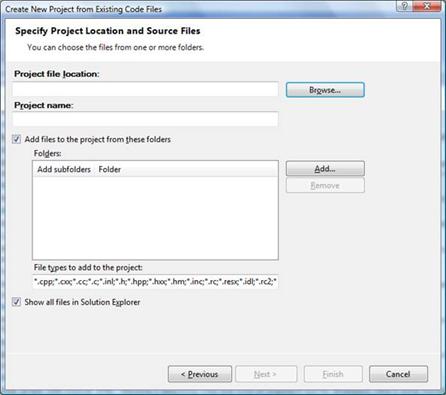
4. You will now see a dialog box like the one below. In this dialog, enter or browse to your directory where you copied the files in step 2. (Note that this needs to be a Windows folder, but your directory is on Toaster. Therefore, you need to map it to a Windows drive.)
Also, give the project a
name, such as ‘Lab 6’. The folder containing the code files should automatically
be added to the ‘Folders’ list. If it’s not add it. Click ‘Finish’.
However, it is possible that you will be presented with another dialog box asking how you want to build your project. In that case, select “Console application project” from the drop-down menu and select the defaults from the next dialog boxes until you get to the one above.
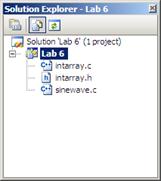
6. Right click on the name of your project and select ‘Properties.’ In the next dialog box, select ‘Configuration Properties’ > ‘Linker’ > ‘System’. You should see a dialog like the following:–
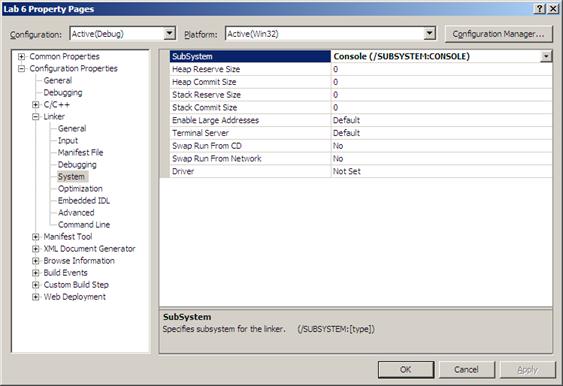
Make sure that the first line on the right panel (i.e., ‘Subsystem’) says ‘Console.’ If not, click on it to reveal a pull-down menu and select ‘Console.’ This creates a typical command-line application that takes the normal command line arguments (argc and argv[]). Click okay.
7. Try to build the code by pressing the ‘F6’ button or clicking ‘Build Solution’ from the ‘Build’ menu. You should see the results of the build in the ‘Output’ window at the bottom of the Visual Studio screen.
8.
To run your program, press the
green button ![]() next
to ‘Debug’ or click ‘F5’. Your program should run without any errors. But did
you notice that all it does is flash a console window for an instant before it
quits?
next
to ‘Debug’ or click ‘F5’. Your program should run without any errors. But did
you notice that all it does is flash a console window for an instant before it
quits?
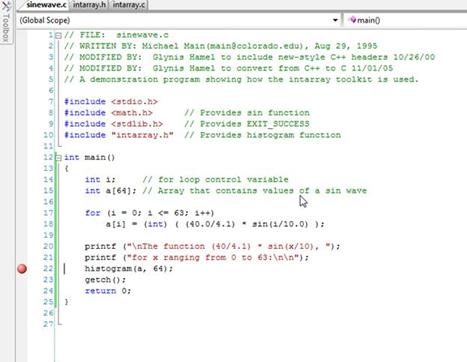
To see what the output looks like, you might want to add getch(); to the main() function in sinewave.c, right before return statement. Now your program will execute and wait for a character input before quitting. You should see something like the following in the console window:–
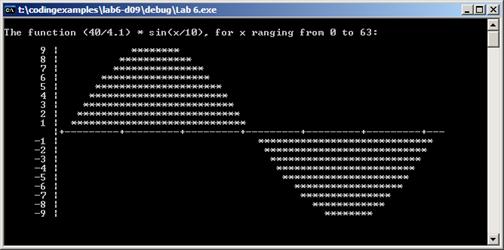
To finish execution, type any character in this window. The window will disappear, and the ‘Output’ panel at the bottom will show the results of execution.
Debugging
9. To
set a breakpoint on any line, open an edit window on the code file (by double
clicking on that file in the ‘Solution Explorer’ window of step 5. Right click on the line where you want to insert the
breakpoint, and select ‘Breakpoint’ > ‘Insert breakpoint.’
Now again press F5 or the green
button at the top, your code should break at the breakpoint inserted earlier.
After it breaks, hover your cursor above a variable name to see what’s in that variable at that point during execution (as shown in the following
screenshot).
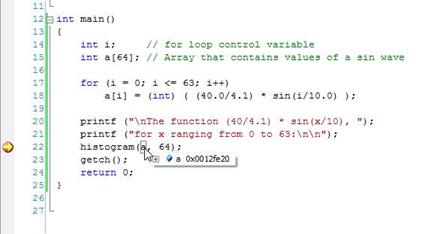
This illustrates the tremendous power and time-saving ability of an Integrated Development Environment. You can simply point and/or click on variables while stopped at a breakpoint to see what that are.
You can also single-step through
your code by click ‘Step into’ or ‘step over’ in the ‘Debug’ menu. Experiment
with these, and see whether your program is doing what you think it should.
Building in release mode
10. So far you were building your project in Debug mode, which is the normal default. When you’re done with debugging and are about to deploy your application, normally you would want to build it on Release mode.
Debug and Release are different configurations for building your project. As the name implies, you generally use the Debug mode for debugging your project (equivalent to the –g switch in gcc), and the Release mode for the final build for end users. The Debug mode does not optimize the binary it produces (as optimizations can greatly complicate debugging), and it generates additional data to aid the debugger. The Release mode enables optimizations and generates less (or no) extra debug data.
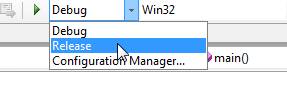
11. To build your project in Release mode, use this dropdown menu and select ‘Release’. You should be all set.
12. You can also clean your project by selecting one of the ‘Clean’ commands from the ‘Build’ menu. Do this now and exit Visual Studio. Open a window on to your Lab 6 folder. Notice that there are a bunch of new files and folders in addition to the three you originally copied. These new files were created by Visual Studio; they describe your project and how to build it. Select all of the files and folders, right click and select “Send to” > “Compressed (zipped) folder”. This zips all files together into a single one. To turn in your lab assignment, use the following command:–
/cs/bin/turnin submit cs2301 LAB6 <your zipped file name>
See you next week!